The January 2025 wave of LEGO® Super Mario™ sets introduced 4 new moulds. Mamma Mia! As we are already way over halfway through the year we thought it was about time to take a look at them. So, without further ado: Let's-a-go!
Products in this article were gifted by The LEGO Group; the author's opinions are their own.
This article contains affiliate links to LEGO.com; we may get a small commission if you purchase.

Plant, Banana Peel, Long with Face print (5740)
This is the third new banana mould in as many years! 2023 gave us Banana Bunch (
3566), followed by Banana Peel (
5215) in 2024. This year it's a LEGO version of the iconic Mario Kart banana!
- Plant, Banana Peel, Long with Face print (5740)
The new banana mould is generally similar to last year's banana peel element, albeit significantly longer (to provide a surface to print the face upon) and is made of solid ABS rather than the rubbery material of its predecessor.
A 3.18mm bar provides a stalk and hidden within the peels is a deep anti-stud. The anti-stud appears to extend deep into the element but stoppers prevent the things like a minifigure neck from being inserted too far into the element (so no banana-headed custom minifigures, unfortunately).
Wheel 24 x 20 (6278) & 30 x 20 (6115)
The Mario Kart sets also introduced 2 new wheels.
- Wheel 24 x 20 (6278)
- Wheel 30 x 20 (6115)
All 6 LEGO Mario Kart sets contain at least one of the two types of these 2 new elements. They are available in a variety of colour combinations.
The two wheels share the same central hub mould which is fitted with different tyres; thus the two sizes.
24mm is a pretty standard size for LEGO wheels: there are many wheels and tyres with this diameter, most notably the wheels used in LEGO® Speed Champions sets.
However, when it came to comparing the larger 30mm wheels, I could only find one other 30mm wheel: Train Wheel RC, Spoked with Technic Axle Hole and Counterweight (
85489). A slightly larger diameter of 30.4mm seems to be a more usual size for LEGO wheels.
Since the 24mm wheel is common in LEGO sets, the wheels compatible with a variety of mudguard elements eg. wheel arch 4 x 2 1/2 x 2 1/3 (
18974) shown above in medium azure, or wheel arch 4 x 2 x 2 1/2 (
3387) in red.
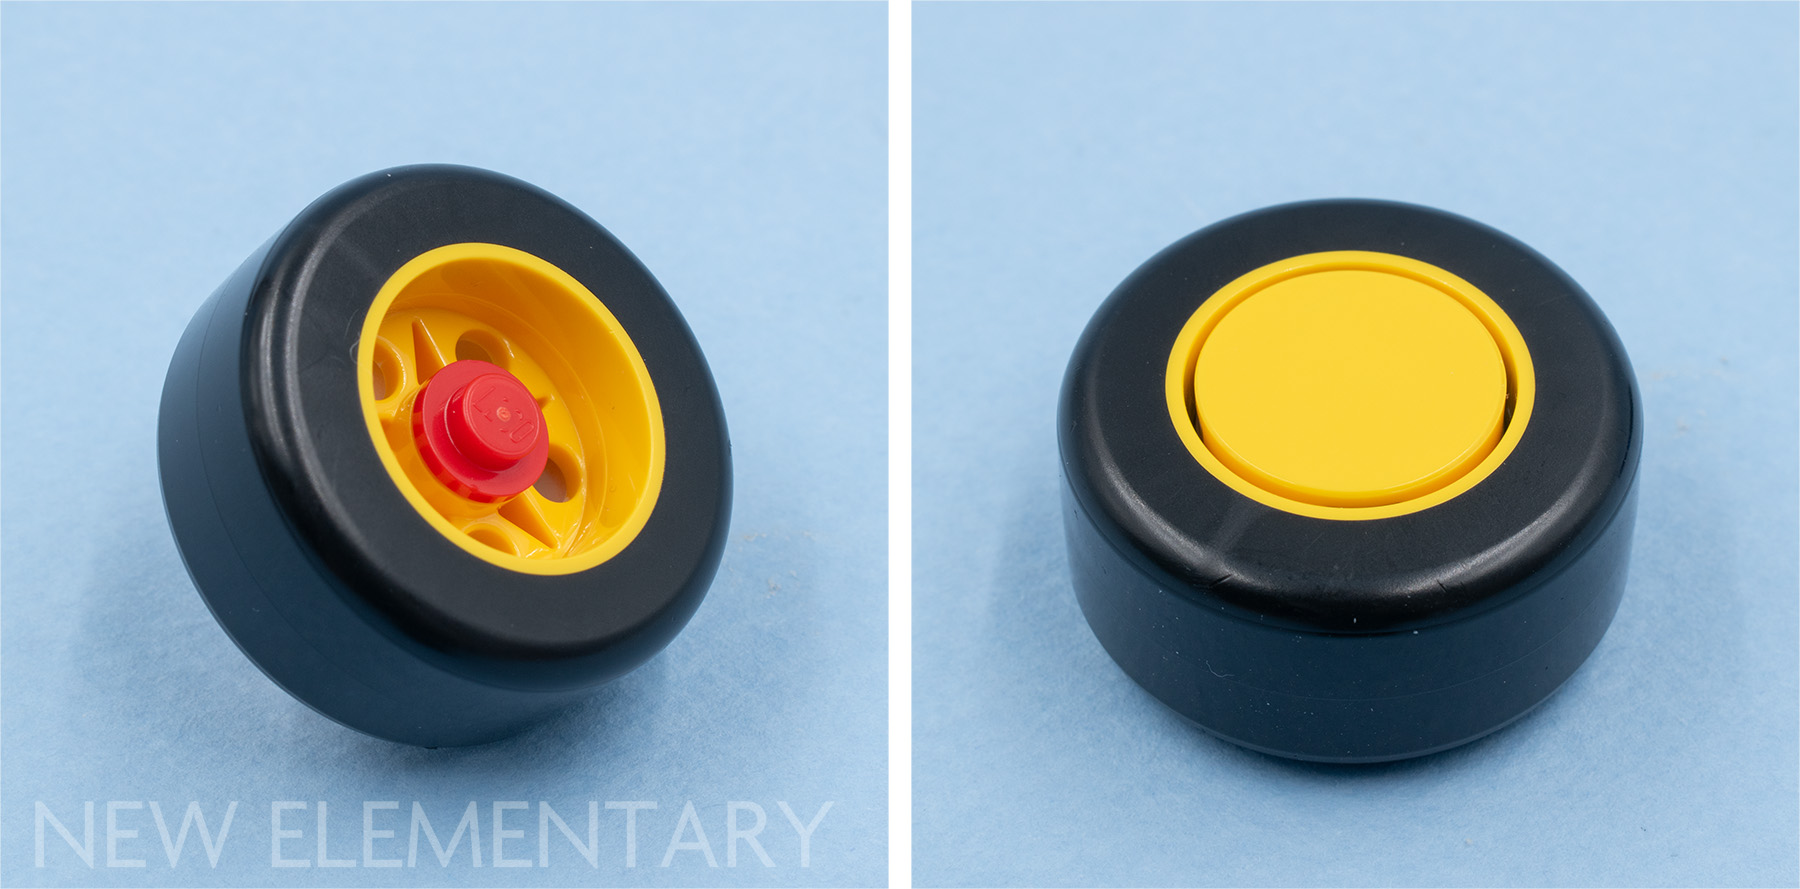
Like the LEGO Speed Champions F1 wheels, the hubs on these new "Mario wheels" is offset. The Mario Kart sets use a 2 x 2 round plate and 2 x 2 tile to create a hubcap which ends up flush with the wall of the tyre. I'd describe the connection with the hub cap as an anti-antistud; the hub has a large hole which grabs the outside edge of the antistud.
Those smaller holes around the large central one seem to be purely decorative; they are just a little wider than a 3.18mm, so a bar fits in very loosely and doesn't connect.
But if you really need to fill that hole, elements with a varying diameter (i.e. a cone) will fit – so horns (
89522, 34078), carrots (
20056), dinosaur tails (
40379) all do the job. Nice to know, even if these probably aren't very useful connections!
One thing that sets the new elements apart is that rather than using the tactile rubber-like material typically used in dual-moulded wheels, the new wheels have a hard plastic tyre which is a lot less grippy – very important for those race winning Drifts!
MOCs inspired by the new wheels
I find that the traditional LEGO rubber tyres aren't particularly useful to use in MOCs (unless used as tyres!) but these new elements might be a little easier to incorporate into models thanks to the material they are made from. Since they are a similar material to most other bricks, they can potentially blend in seamlessly compared to the rubber tyres which have a clear visual and textural difference.
I used the 24x20 wheel (
6278) in the smokestack of this cutesy train. I think the bubbly shape of the wheel works well in this cartoonish build. The Casey Jr. engine from Dumbo provided the base idea, along with
43212 Disney Celebration Train which informed the colour scheme.
This printed 3x3 round tile (
6483012) really caught my eye – it's the part that originally inspired me to make the black locomotive but unfortunately the print didn't quite work; I was thinking along the lines of character inspired by Thomas the Tank Engine. I've achieved that here, but noticeably, it doesn't use any of the new wheels.
Projectile, Koopa Troopa Shell with Lever (5446)
This part is available in two colours:
- Projectile, Koopa Troopa Shell with Lever with Bright Green Top Pattern in White (6524448 | 5446)
- Projectile, Koopa Troopa Shell with Lever with Red Top Pattern in White (6524449 | 5446)
At least one of each shell is included in all 6 LEGO Mario Kart sets.
At a glance, the elements appear to be smaller versions of the various Koopa Trooper shells that have been used throughout the LEGO Mario sets; the existing 4 x 4 footprint downsized to a mere 2 x 2.
Unlike the larger shells, there are no studs to be found on these elements.
The underside functions like the bottom of a 2x2 brick but the white lip around the element protrudes out a further half-plate. Fortunately, neither the lip nor the tab interfere with the element's ability to attach to a baseplate.
Something I overlooked when I raised my hand to take a look at these sets for New E. was the tab that protrudes from the element, a feature that makes the element quite difficult to incorporate into MOCs.
The tab is designed to interface with Launcher, Weapon Gun / Blaster / Shooter Square (
69767). Up until this point, the stud shooter has only been used to shoot 1x1 round tiles or plates, so the mini Koopa shell is the first part to be created specifically to work with this element.
As you can see in the image above, the tab is too large to insert into the bottom of a 1x1 or 1x2 brick, so we'll have to think of other ways to disguise this portion of the element if we wish to use it in MOCs.
For a rather bulky projectile, the shells shoot surprisingly well!
I found that the angled sides on the shell match a cheese slope – perhaps not particularly useful, but I appreciate the element designers attention to detail (and respect for The LEGO® System!)
MOCs with the Koopa Trooper shell
Of the four new moulds to appear in the Mario Kart sets, the mini Koopa shells were the most interesting for me to explore. With that annoying tab jutting out the side, I expected these elements to be the most difficult to work with but they actually yielded the most MOCs!
Shell tank
My first thought with the element was, rather than hide the tab, use it to my advantage:
Paired with the larger shell, and just a handful of extra parts, the tab became the gun barrel on a tiny tank.
B2, is that you?
The 2 shell sizes worked well together in a model, so I played with the idea a little further.
The design of this droid is based heavily on the character B2EMO that appears in the Star Wars TV show Andor. The character has a very blocky octagonal design that reminded me of the Koopa shell elements. I used 45° slopes in the droid's body to match the 8-sided shape of the shell.
I initially tried to hide the tabs within the octagonal stack that makes up the body but with their awkward size and shape, nothing really looked quite right. Fortunately, it all worked out in the end: I left them visible and they blended rather nicely into droid's bodywork.
There's nothing too complicated about this model: the breakdown above should be enough for you to reverse engineer your own.
Having the base come together with the 3 x 3 'X' plate (
15397) in the centre and attaching the shells at 45° was a revelation – and quite satisfying! While attaching the shells to the base, I found that replacing the ingots for tiles knocked things out of System; they taper ever so slightly towards the base.
Big droid
I'll be honest, when it came to working with these elements I was initially pretty stumped. I turned to New E. parts wizard Tom Loftus for a bit of direction and his advice was 'anything looks good on a mech'.
With the tabs seemingly impossible to hide at this point (although I did try and fail yet again), I used them to suggest some mechanical details on this mech's arms. Using Plate Angled 2 x 2 with Step and Hole in Center (
79846) as the base of the arm seemed like cheating but was ultimately the best solution to fit the awkward shells into the design.
Set 72031 on LEGO.com
 Set 72033 on LEGO.com
 Set 72035 on LEGO.com
 Set 72036 on LEGO.com

READ MORE: Exploring Tile Special 2 x 2 with Ring (6805) from LEGO® Classic
Help New Elementary keep publishing articles like this. Become a Patron!
A huge thank you to all our patrons for your support, especially our 'Vibrant Coral' tier: London AFOLs, Antonio Serra, Beyond the Brick,
Huw Millington, Dave Schefcik, David and Breda Fennell, Gerald Lasser, Baixo LMmodels, Sue Ann Barber and Trevor Clark, Markus Rollbühler, Elspeth De Montes, Megan Lum, Andy Price, Chuck Hagenbuch, Jf, Wayne R. Tyler, Daniel Church, Lukas Kurth (StoneWars), Timo Luehnen, Chris Wight, Jonathan Breidert, Brick Owl, BrickCats, Erin and Dale, Thunderdave, Jake Forbes and our newest top-tier patron, H.Y. Leung! You folks are better than inverted cheese slopes.
All text and images are ©2025 New Elementary unless otherwise attributed.


I still find it anti-system for LEGO to merge wheels and tires.
ReplyDeleteWhen they started doing that for Speed Champions, I thought that it was to help kids, that the new tires were too thin to easily fit. But then I got some sets from other brands with the exact same wheel & tires in 2 parts, and they're perfectly fine!
So, it was definitely doable. And still, LEGO also had the option of pre-fitting them with no dual moulding involved.
Agreed. It's difficult to understand why TLG works against the notion of elements making a whole when it is exactly what they are supposed to do. They did the exact same with the ridiculously large dinosaur that consists of only five parts. Why not make it brick built? TLG is proving that they don't know their own product, or worse they hate it.
DeleteIn this case the decision seems to have been based on a desire to have slick "tires" that drift easily instead of gripping—since the tires aren't rubber you couldn't exactly stretch them around a wheel hub the way you can with "real" tires.
DeleteFair enough in this case then. I don't have any of these Mario wheels yet, I thought they were somewhat grippy.
DeleteAtt Anonymous - The licensor, in these cases Jurassic World and F1, have enormous pull on how it should look and TLG have to bend their own rules sometimes in order to have designs and bricks approved by them.
DeleteIf IPs are in charge of what TLG is allowed to produce, then it's quite clear that advertising is more important than being a unique toy. If chasing fads is the direction Lego continues going in, then I can't see this perpetual self-medicating corporate slavery ending well. It goes far beyond a simple deal with the devil when it sacrifices brand integrity. "There's a big difference between kneeling down and bending over." ~ Frank Zappa.
DeleteWhile I respect that obviously having wheels and tires seperate gives more options to us as builders, I don't think it's an absolutely terrible change (although I acknowledge my bias, I do dislike pushing wheels into tires and getting them to fit properly!)
DeleteAs for moulded animals, this is an issue that dates back to the original Dinosaurs line and only got more specialised from there, through two more dinosaur themes between Jurassic themes. I think clearly moulded animals are just popular, just like minifigures. Again, I don't really think this is an absolutely terrible thing, certainly it isn't for me, especially with the price Lego charge for these moulded dinosaurs. I think it's just a matter of factors bigger than we necessarily are familiar with, they spend a lot of money on market research, and plenty of people seemed disappointed by the recent brick built dinosaur in the last wave of Jurassic park.
But, then we have lines like Creator that show pretty clearly that Lego still care about the system.
Firstly, thank you for addressing my statements and not attacking me. It's quite refreshing.
DeleteRegarding the wheels, I am someone who far more prefers separate tires and hubs. But I have to ask, is it really that difficult to get the tires on? Apologies if that sounds demeaning, but I don't see any other way to address your bias without sounding like it's an attack on abilities, capacities, and drive. BUT, as I'll explain, that is the crux of my observation. Put simply: Complacency.
It costs more to produce a dual-molded wheel, but it's easier. It costs more to make massive body parts for the dino, but it's easier. It costs more to print parts rather than design color blocks to build, but it's easier. I agree that those large pieces have always been an issue, but ignoring it is easier, and on a smaller scale they are easier to accept and ignore by us. When the Creator line delivers sets like the tiger a couple years back (IMO one of the greatest sets ever produced in my fifty plus years playing with this stuff), it makes me question if they care about the lost potential they are building into their product, and as a result, any bourgeoning builder. What can that gigantic body part be used for other than a gigantic body part? Same with the complete wheels, what MORE can be done with one part rather than two? This then taps into the far greater issue of complacency in the consumer. We settle for this despite knowing that tiger sets are possible. The brick-built dinos themselves in the line look great and those sets are reasonably priced even with their hefty IP tax, what makes them look better is that they embody the idea of Lego with their hefty potential to look like EVERYTHING else.
The same can be said with the separated wheels. I can accept the F1 single pieces given the scale, but I would prefer at least a second compound set for realism (maybe a pre-wrecked Aston for Stroll. ZING!). The Mario dual molds would benefit with a similar function in a second, treaded tire for different terrain on a universal hub. But again, I am willing to accept this given the scale.
My issue is more concerned with regards to a dino that consists of five parts and is longer than a baseplate. At that point, they are selling a dino WITH Lego instead of Lego WITH a dino. This marriage with controlling IPs is turning Lego into a fad, and Lego has proven throughout their history that they are definitely not that. But it's easier. (And any market research can be easily manipulated and interpreted to accommodate any narrative trend depending on the questions asked.)
I know that this argument encapsulates multiple fronts, however I trust that you can see that they are all related from a single source. And that is, what is Lego?
That Thomas and friends build is awesome, do you have the directions anywhere?
ReplyDeleteHave you tried to figure it out on your own?
Delete