
Products in this article were provided by LEGO®; the author's opinions are their own.

The LEGO® Technic line includes what could be called the "modern large helicopter" range of sets: 9396 Helicopter, 42052 Heavy Lift Helicopter and 42113 Bell-Boeing V-22 Osprey (the latter can be considered a helicopter, and regardless of being cancelled by TLG, copies did get sold). Now, the fourth is approaching: 42145 Airbus H175 Rescue Helicopter. Will you give it permission to land?Priced at £179.99/ US$209.99/ DE€209.99/ AU$329.99 and available from 1 August 2022, the set contains 2001 pieces. If you're preordering or buying it from LEGO.com, please consider using our affiliate links, New Elementary may get a commission: USA LEGO Shop | Australia LEGO Shop | UK LEGO Shop/for Europe 'Change region'.
Brief Summary of Real-World Helicopter Controls
Right off the bat, I can tell you this is the most mechanically realistic – and complex – LEGO helicopter to date. Therefore to begin, so you can better appreciate what it brings and some of the specific technical terms I'll be using, here is a very brief introduction about some of a helicopter's controls.
Directly underneath a helicopter's rotor is a mechanism called the swashplate, which can tilt in all directions. This tilting makes the connected rotor blades generate more lift on any chosen side, and that's what allows a helicopter to fly forwards and backwards as well sideways. The swashplate's inclination is called the cyclic, and the pilot controls it with the joystick.
Besides tilting, the swashplate can also move up and down, which affects all blades equally and helps the helicopter ascend and descend. This vertical movement of the swashplate is called the collective, and the pilot adjusts it with the collective lever, to the left of their seat.
This Wikipedia article goes deeper in this subject, in case you're interested. And with that out of the way, let's look at LEGO stuff, because that's what you came here for, right?
New Moulds in LEGO® Technic 42145
Almost all the new moulds in this set are related to its rotor mechanism. They allow both a realistic swashplate and a five-bladed rotor, either of which would be very difficult to implement using only previous moulds.
Three of the new moulds (shown below, in top and bottom views) are
highly specialised and designed to work with one another. Remarkably,
all three have analogues in the aforementioned 8856 Whirlwind Rescue,
even though their functionality is slightly different: whereas the old
parts tilt the whole rotor in response to cyclic inputs, the new ones
are able to only change the blades' pitch, like real helicopters do.
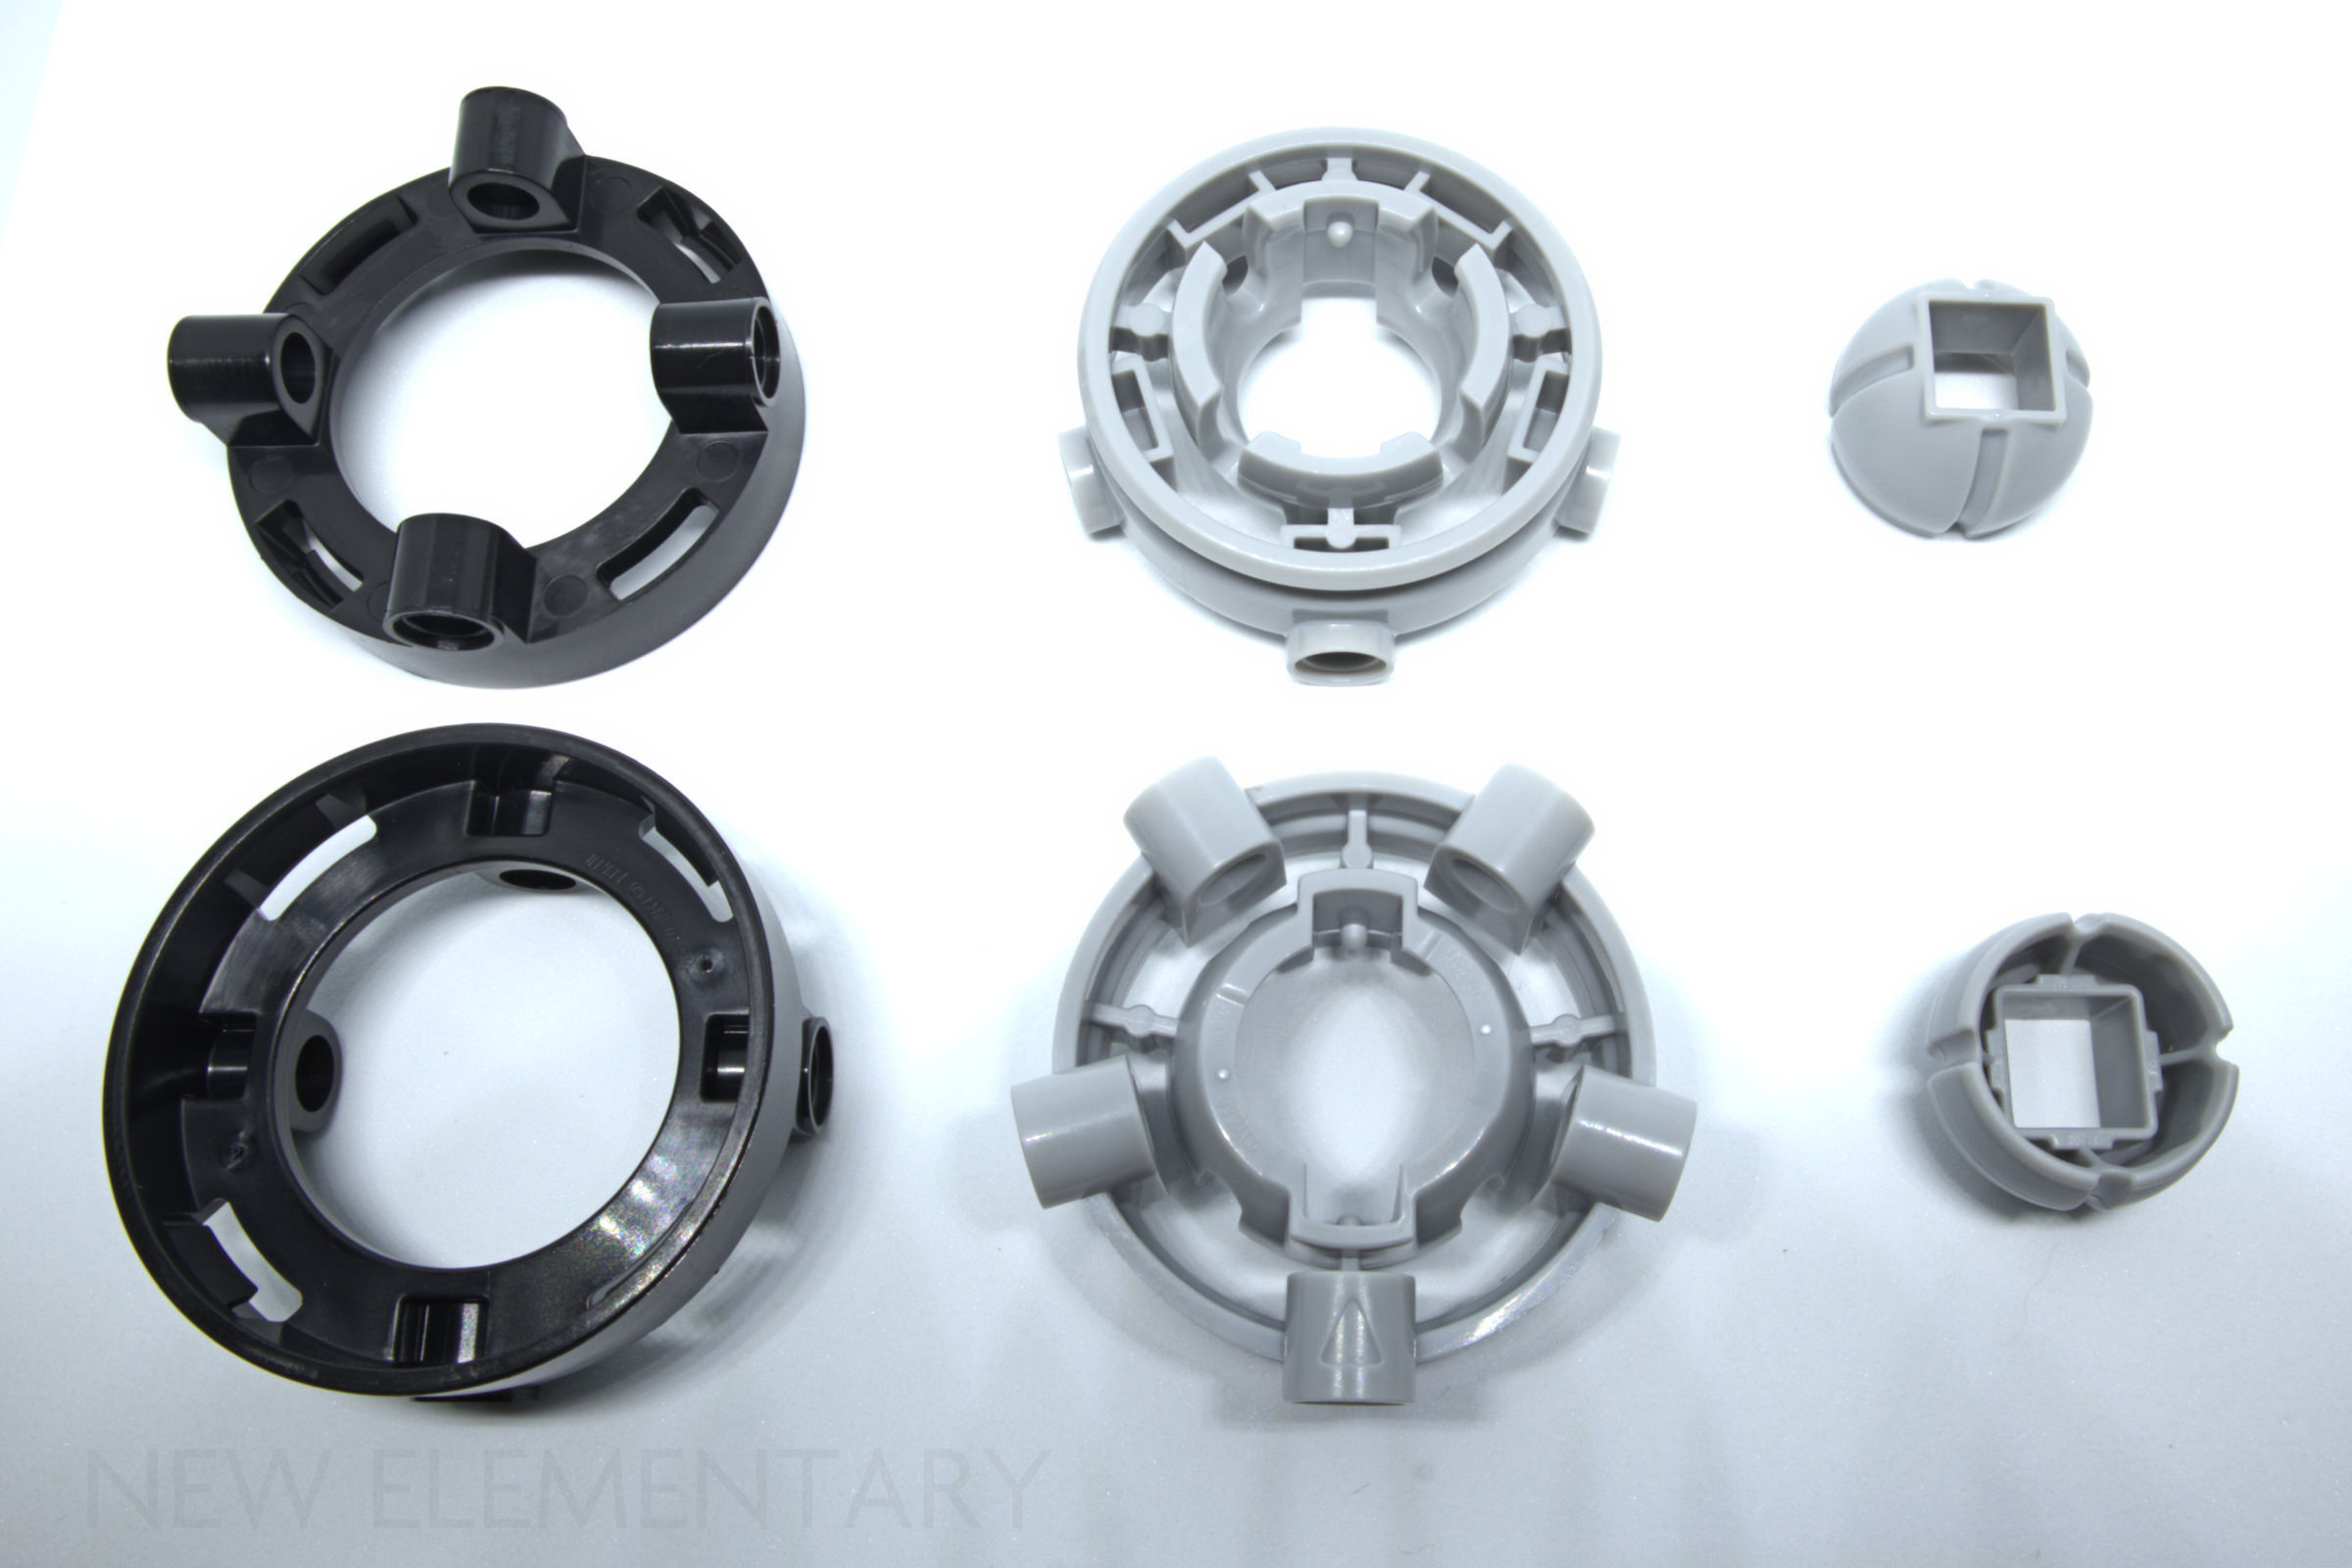
The set comes with one of each. The two on the left can be considered to be two halves of a turntable, and it is in this capacity that, in the absence of official nomenclature, I thought of these names for the whole lot of them, from left to right:
- Technic Turntable 5 x 5 Base with 4 Pin Holes, in Black (6411325 | 01937)
- Technic Turntable 5 x 5 Top with 5 Pin Holes, in Light Bluish Grey (6399646 | 01936)
- Technic Ball Joint with Square Hole, in Light Bluish Grey (6399648 | 01938)
Note the triangular indentation on the light grey mould that marks one of the pin holes: this is to help with the correct assembly.

The three of them snap together to form a complete swashplate (upside down in the above photo, to better reveal its central portion). The grey parts spin around a central beam, hence the hole in the middle is square, not round. The black part doesn't rotate, and instead is tilted by the mechanisms inside the helicopter's fuselage.
All in all, with four holes on one half and five on the other, plus the square hole, this assembly is terrific for helicopter models (as long as the aircraft has a five-blade rotor), but I don't think it'll see much use elsewhere. The next new mould, however, should have wider applications.

- Technic Propeller 5 Blade 9 Stud Diameter with Square Hole, in Light Bluish Grey (6362556 | 80273)

Five-sided geometry is very unusual in LEGO, and as far as I can recall, five-sided connectors are unheard of. Above you can see the connections between the starfish arms that I found; and although I didn't feel any element being forced, I didn't actually calculate the geometry to make sure these connections are 100% legal. There are surely more, though, especially if you extend the arms out further with beams. I can see this mould being used many more times in the future, not only in LEGO Technic, as a seed part for five-sided constructions.

The centre of the starfish beam, with its diameter and square hole, immediately reminded me of the small Technic turntable (99009 and 99010). While the diameters and holes do match up, sadly there's no way to actually attach them to each other. This was a missed opportunity to make the starfish more usable; but perhaps the mould would have become too expensive... or this simply didn't cross the designer's mind.
Normally, a new mould is reason to rejoice... but this next one has a bittersweet taste.

- Hub, Powered Up 2-Port (Non-Bluetooth) - Screw Opening (6375902 | 80736)
It is similar to Hub, Powered Up 2-Port (Non-Bluetooth) (22167) which appeared in the cancelled 42113 Bell Boeing V-22 Osprey, but requires a screwdriver to change batteries.

A similar fate befell its "smart" counterpart with Bluetooth and four ports (shown on the right in the photo above), which initially had its battery compartment accessible by opening two tabs. Then a change happened, perhaps spurred by toy safety laws (won't somebody please think of the poor children that spend their days swallowing AA batteries).
42145 brings back the "dumb" hub from the Osprey, but unfortunately now with the same tool requirement.

Furthermore, the box doesn't mention this requirement anywhere and a screwdriver isn't included. Cost isn't the issue - tons of cheap Chinese toys come with one like in the photo above, even some that don't even require a screwdriver!

Anyway, the "dumb" hub has the same exact dimensions and building interface as the "smart" hub (22127) but instead of four ports and Bluetooth connectivity, it has two ports, each with its on-off-reverse control. These controls are accessible by sticking axles on the sides or levers on the top.
Parts in New Colours
2022 is apparently the Year of Neon Yellow. It has appeared extensively in LEGO® City sets, mostly as trim on emergency vehicles. It had a shy start in LEGO Technic, with 42140 App-Controlled Transformation Vehicle, and now comes in full force in the Airbus H175.

These are the moulds that make their debut in this new colour:
- 4x Technic Axle and Pin Connector Perpendicular (6402250 | 6536)
- 1x Technic Panel Fairing #21 Very Small Smooth, Side B (6398780 | 11946)
- 1x Technic Panel Fairing #22 Very Small Smooth, Side A (6398781 | 11947)
- 1x Technic Panel 5 x 11 x 1 Tapered (6402248 | 18945)
- 2x Technic Axle and Pin Connector Angled #1 (6402247 | 32013)
- 2x Technic Beam 1 x 5 Thin (6402251 | 32017)
- 2x Technic Beam 2 x 4 L-Shape Thick (6402249 | 32140)
- 4x Technic Beam 1 x 5 Thick (6398779 | 32316)
- 4x Technic Beam 1 x 3 Thick (6398782 | 32523)
- 10x Technic Beam 1 x 2 Thick with Pin Hole and Axle Hole (6402246 | 60483)
- 1x Technic Panel 3 x 7 x 1 (6398778 | 71709)
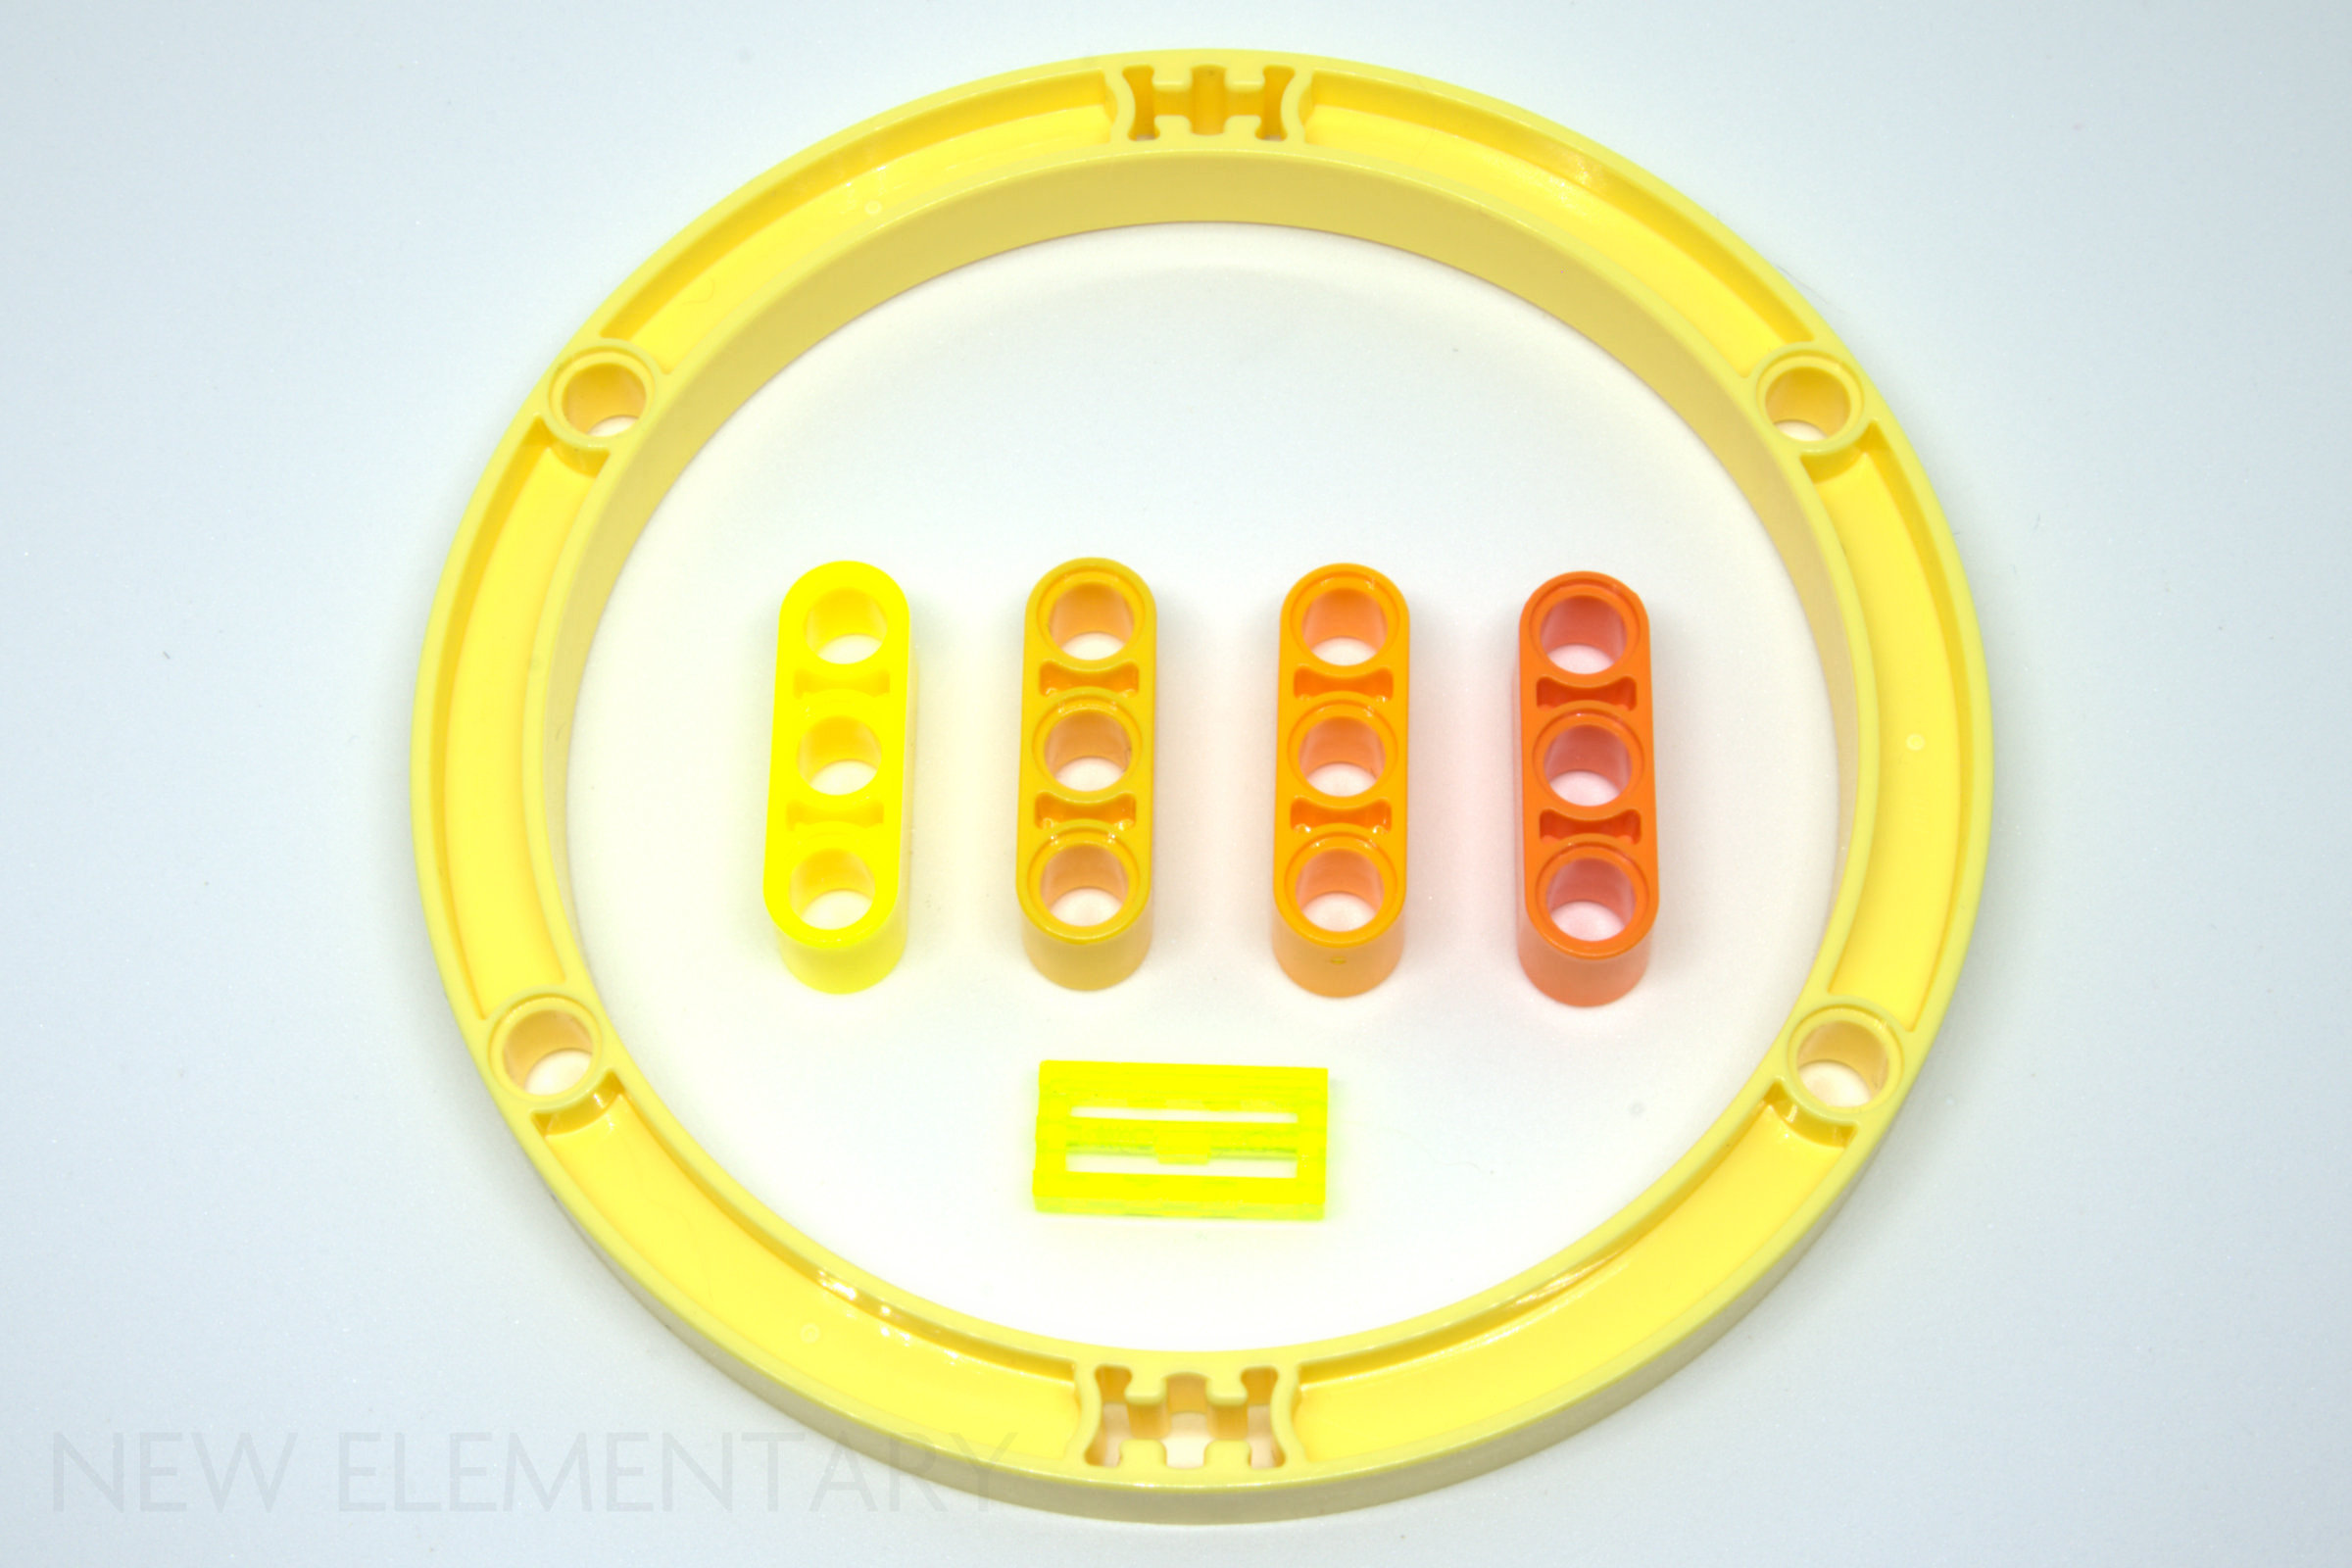
Yellow appears to be joining blue in its infamous "Fifty Shades"; here are the shades of yellow LEGO Technic that I own. The 3L beams in the middle are, from left to right, Neon Yellow, Yellow, Bright Light Orange, and Orange. The ring is Bright Light Yellow, and, for good measure, I added a grille tile in Trans-Neon Green.
To be honest, I don't know what to think about this colour. The tiny LEGO Technic figure on one of my shoulders is furious because there's yet another weird colour for parts to spread amongst, which makes creating MOCs with a consistent colour scheme harder. The tiny M:Tron astronaut on my other shoulder, however, is exuberant to have what appears to be an opaque trans-neon green to build SPACESHIPS! and other vehicles with.
Which makes me wonder... does vibrant yellow have that lovely "kryptonite glow" under UV light, like trans-neon green? Well, see for yourself.

Quoting a great and misunderstood philosopher, "it's hard to overstate my satisfaction": neon yellow has a fluorescence very comparable to trans-neon green. Even if TLG doesn't produce any more Technic moulds in neon yellow, the parts introduced in 42140 and now 42145 should be enough to open the door to M:Tron Technic MOCs. Yum yum!

But not everything is fluorescent roses. Like bright light yellow, neon yellow suffers from translucency: it's possible to glimpse some inserted dark parts, such as friction pins.

While neon yellow is a new wacky colour I'm still not sure about, I have no such doubts about good ol' regular white. I'm glad to see a few moulds appear for the first time in this colour in this set, namely:
- 4x Technic Panel Curved 11 x 3 with 10 Pin Holes through Panel Surface (6043318 | 11954)
- 2x Technic Beam 3 x 3 T-Shape Thick (6402262 | 60484)
- 2x Technic Axle and Pin Connector Perpendicular Triple (6402213 | 63869)
Technic Gear 20 Tooth Double Bevel with Clutch on Both Sides (35185) is relatively recent and previously came only in Blue. With the introduction of Technic Gear 12 Tooth with Axle Hole (69778) also in blue, maybe TLG thought people would mistake those two and decided to change colours? Only time will tell which colour will prevail for this gear: green or blue. [Update: turns out this is instead a new mould: while the previous 20T clutch gear is of the double-bevel type, this is a spur gear.]

When 9396 Helicopter appeared, it introduced Technic Rotor Blade 31L with Beam 3L with Black Rubber Tip (6170508 | 99013pat0001), in dark bluish grey with a dual-moulded black rubber tip. The H175 a new variant of this mould: the body is the same, but the rubber tip is now yellow. This should make it easier to see, and thus safer, when mounted on a high-speed rotor.
The set comes with 5 of these, in Dark Bluish Grey (6387405 | 28844).

I was surprised that Dish 8 x 8 Inverted didn't yet exist in Red (6402243 | 3961), but here it is, for the first time since the mould's introduction way back in 1979. The set comes with one of these, which should become quite coveted by builders of many themes.
Technic Panel 3 x 7 x 1 was introduced last year, and now it also gets a welcome recolour in Red (6379345 | 71709). The set includes two of these.
Other Parts of Interest
The H175 has a few other interesting parts.

To motorise functions, the set comes with 1x Motor, Large, Powered Up (6342598 | 22169). The included "dumb" hub can't use this motor's absolute positioning control and therefore could in theory use the simpler Motor, Medium, We-Do 2.0 (21980). Perhaps the mechanisms require a stronger motor, even if its advanced functions are left unused? Regardless, I'm happy to get this better motor, which should be more useful for MOCs than its simple cousin.

These elements aren't common or only appeared recently, so their inclusion here is also welcome:
- 2x Technic Panel 5 x 11 x 1 Tapered in Red (6258093 | 18945)
- 2x Technic Beam 2 x 3 L-Shape with Quarter Ellipse Thick in Red (6381444 | 71708)
- 1x Technic Beam 1 x 7 Thin in Blue (6357992 | 32065)
- 6x Technic Beam 2 x 3 L-Shape with Quarter Ellipse Thick in White (6345327 | 71708)
- 4x Technic Panel Fairing 2 x 3 x 1 in White (6334548 | 71682)
- 1x Technic Panel 3 x 7 x 1 in White (6345328 | 71709)
- 2x Technic Axle Connector with Axle Hole in White [Reinforced] (6375684 | 42135)
- 1x Technic Axle and Pin Connector Perpendicular Double Split in White (6346389 | 41678)
- 2x Technic Beam 2 x 5 L-Shape with Quarter Ellipse Thick in Dark Bluish Grey (6407065 | 80286)

Technic Disk 3 x 3 with Light Bluish Grey Lines print (Fan Blades) (6306819 | 2723pr0003) appeared in a single set in 2020, 60262 Passenger Airplane. Unlike what its name implies, the fan blade print is a spiffy metallic silver, not a regular boring grey. The set comes with 2 of these.
These two gears were introduced this year and it's nice to continue seeing them in new sets:
- 2x Technic Gear 12 Tooth with Axle Hole in Blue (6396479 | 69778)
- 6x Technic Gear 20 Tooth with Axle Hole [+ Opening] in Dark Azure (6396480 | 69779)
Finally, these two connectors appeared recently, and one can never have too many of them:
- 14x Technic Axle Pin 3L with No Friction Ridges and 2L Axle in White (6289797 | 65249)
- 4x Technic Pin Long 3l, No Friction Ridges, with Stop and Hole in Light Bluish Grey (6338962 | 77765)
Sticker Sheets
The set comes with two sticker sheets. In my opinion, leaving them out doesn’t seriously compromise the helicopter’s looks, although you’ll have to memorise or guess how the levers for the motorised functions work.


The larger sticker sheet is the standard white-backed fare, while the smaller one is clear-backed. The stickers in this latter sheet are supposed to go on a neon yellow part; on one hand, this guarantees there won’t be colour mismatch between the sticker background and the part underneath; on the other, any air bubbles trapped underneath will be more visible.
The Build
The building process is divided in four stages. Broadly speaking, we first build the bottom of the chopper, then the front, the rear, the top, and finally some cosmetic touches here and there.
At the end of the first stage, we build the bottom of the fuselage, which houses the hub and the landing gear. The build already contains a fairly complex linkage to connect front and rear landing gear; a sign of things to come.

During phase 2, as I was building the interior of the cockpit together with the control linkages, the only expression that crossed my mind was "black magic". The way the two sets of stick and collective lever interact with each other and move all that stuff behind the dark grey seats is mindboggling. It was at this phase that I started worrying a bit: the two light grey 7L beams on top of the assembly, which will tilt the swashplate sideways, ended up tilted slightly forwards, while the instructions show them tilted backwards instead. I reviewed what I had done and couldn't find no building mistakes, so I moved on and hoped for the best.

This is what the model looks after the second set of bags. The cockpit is done, as well as the mechanisms responsible for controlling the swashplate.

Bags #3 build the gearbox responsible for the motorised functions, located at the aft of the craft. Notably, the main rotor shaft and the swashplate are also added here.
The instructions show the three steering arms (64872) connected to the swashplate at the same height with the cyclic sticks centred and the collective in its lowest position. As you can see, the model has instead the front arm lower than the others, leading to the swashplate being tilted forwards. Again, I checked what I built and could find no mistakes.

After the fourth stage of the build, the tail, the passenger doors and the rotor head are in place. This is where most of the set's neon yellow parts are used. The tail rotor is mounted in a relatively complex way, to ensure it's slightly tilted upwards, to better mimic the real aircraft.

The Completed Model

And here it is, finally completed. It looks quite nice and finished, with the possible exception of the lower rear, where the motor sticks out. Fortunately, this hollowness is barely visible.
The chosen livery could in my opinion have one less colour: white, red, black and yellow is a bit too much. Plus, a quick Google Image search didn't yield any results for a real-life rescue helicopters with this colour scheme. Still, I've seen messier schemes in LEGO Technic, such as 9398 4x4 Crawler.

I found it odd that the back part of the upper fuselage forms a "whale tail", but it's also present on the real thing, so that's correct.
In theory, any LEGO Technic set should do more than stand prettily on a shelf (or perhaps, the case of aircraft, hanging from a ceiling), so let's see what 42125 does.
First of all, let's check the manual features. The pilots' doors open, in a slightly upwards angle; most likely this matches the real thing. The passenger doors on both sides also slide open. On the port side, there's what appears to be a camera, that can be pitched and rotated. There's also what I assume to be a chin-mounted rotatable camera or radar dome.


On the starboard side, there are two more levers and the helicopter's winch. The winch can be raised and lowered from the upper lever, and the lower lever extends and retracts the landing gear.
We now come to this set's biggest innovation: the realistic collective and cyclic controls. Collective control has been present in LEGO Technic from way back in the theme's very first year, with 852 Helicopter from 1977, but then done again only once, in 9396 Helicopter from 2012. Other sets such as 8856 Whirlwind Rescue mimic cyclic control by tilting the whole rotor, but that's not how real helicopters work.
42125 manages to have not only realistic collective and cyclic controls, but also to have them routed to the correct locations inside the craft's cockpit. That's astounding.

As I mentioned at the beginning, each seat has a collective lever on its left side. There's a third lever on the exterior port side, for hand-of-god convenience. This makes the whole swashplate slide vertically on the main rotor's shaft.
There's also a cyclic stick in front of each seat. The swashplate's tilting accompanies the tilting of any of the sticks.
As I wrote earlier, despite my checks to make sure I built everything according to the instructions, my review copy doesn't work well: with the cyclic sticks centred, the swashplate is tilted forwards instead of remaining horizontal. I likely made a mistake and was unable to catch it, but errors in instructions isn't something unheard of (*cough*42143*cough*).

The underside doesn't have any mechanisms to see. Instead, you have the hub's battery compartment lid, which should be a pain in the backside to perform maintenance on; note that, to lay the chopper on its side for this photo, I had to remove two blades from the main rotor. Besides the not-lovely battery lid, we do get some details, such as lights, a central hook (presumably for cargo), and the aforementioned chin-mounted camera.

The only other member of the "modern large helicopter" range I have assembled is 9396 Helicopter, but it should suffice for comparison. They are both roughly at the same scale, and with 9396's optional motorisation, also weigh roughly the same. By the way, sorry for the background: my photo tent can't accommodate two of these giants.

The B-model
Once again, there's no B-model. Given these have sadly become the exception rather than the norm, I'll stop reporting on non-existent B-models, and only mention them in the rare honourable cases when they do exist.Conclusion
This is the most mechanically realistic and complex LEGO helicopter to date. The rotor control mechanism is amazing to build and play with, the motorised functions work well, and all this is crammed in a sleek body. The swashplate elements should be greatly appreciated by helicopter builders, and are unlikely to appear in many other sets. Quite a few useful parts appear here for the first time in equally useful colours. The return of the "dumb" hub, even if nerfed by the screwed cover, is also welcome.

On the other hand, not everyone will like yet another colour in LEGO Technic, especially one as "loud" as neon yellow. I'm sad that the cyclic/collective mechanism doesn't fully work; again, the error could be in me or in the instructions.
This set will be available from 1 August for £179.99/ US$209.99/ DE€209.99/ AU$329.99. Even considering the presence of electric components, at first sight this seems excessive; around $180/ £160/ €180 feels to me a slightly fairer price for what we get. However, given the current international situation and the announced price increases of LEGO products, I kind of understand the proposed amounts. If you're buying it from LEGO.com, please consider using
our affiliate links, New Elementary may get a commission: USA LEGO Shop | Australia LEGO Shop | UK LEGO Shop/for Europe 'Change region'.
This set is worth more than its parts: it's one of those that deserves to stay assembled, be played with, and be shown to friends ("see, this is how a helicopter works"). If, however, you're considering it for its parts, most likely you'll want either the rotor elements or the neon elements, but perhaps not both. How about you find a friend that wants the stuff in the set that you don't care about, buy it together, then part it out between yourselves?

Oh, and here's how the H175 fluoresces under UV light. I really, really had to see what it looks like.

"Uh, sir, if we try airlifting this thing, we'll be the ones in need of rescue..."
READ MORE: Create your dream part, Technic or otherwise, and you could win a LEGO set!
Help New Elementary keep publishing articles like this. Become a Patron!
Massive thanks go to our 'Vibrant Coral' patrons: Daniel Church, Amy Hays, Chuck Hagenbuch, Joe Fontana, Elspeth De Montes, Megan Lum, Markus Rollbühler, Baixo LMmodels, Andy Price, Anthony Wright, London AFOLs, Gerald Lasser, Big B Bricks, Dave Schefcik, David and Breda Fennell, Huw Millington, Antonio Serra, Beyond the Brick, Sue Ann Barber & Trevor Clark, and Kevin Gascoigne.
LEGO® Shop at Home
USA: FREE SHIPPING every day on orders over $35!
UK: Free delivery when you spend £50 or more at LEGO!
Australia:
Discover the latest promotions and offers on LEGO.com
All text and images are © New Elementary unless otherwise attributed.
That green gear doesn't look like a 35185! There is no double bevel. I believe it's a new mould -- and a very welcome one for us high-performance MOC gearbox builders.
ReplyDeleteAgreed, that green gear appears to be a new part.
DeleteYes, you're right! I just noticed it was a clutch gear and with 20 teeth, didn't remember to check if it was a double-bevel like the existing mould or a spur. This is therefore a new mould indeed.
DeleteA lovely review on a lovely set, but I am similarly baffled by neon yellow. I grew up in the eighties and nineties, when everything was suddenly aggressively neon, including the toys and our candy, so it's strangely nostalgic to see this colour return (and sure enough, I can see it make an appearance in Blacktron II as well (BRING BACK BLACKTRON)).
ReplyDeleteIt's just that - well, it's nostalgic, but is it good? Is it useful? It's strangely translucent, and it really does make the parts look a lot cheaper than the more opague colours (or even the actual trans-colours, which are generally far more vibrant and rich, contrast for instance trans neon-green, which is powerfully striking).
I see the appeal of most of the new colours, but I'm still very much on the fence when it comes to neon-yellow. I think that, if only it were more opague, I'd be right there for it.
My feeling, too. It could be more opaque, but, anyway, if we're to use it to mimic space canopies its translucency isn't a problem. 😉
DeleteAs an owner of 9396 I'm a little bite confuse - do I really need this set? They are really similar, but at the same time, the rotor mechanism in the new one is just beautiful)
ReplyDeleteHi. I am currently building this set and have found the same error as you with the swashplate tilting forward when the stick is neutral. I have also found an error in the instructions on pretty much all pages where the front linkage arm is displayed. In the instructions a lift arm clips an axle which creates the offset that would make the swashplate neutral.
ReplyDeleteCurious to see if anyone fixes this.
I actually just found a way to mostly fix it.
DeletePut a half width grey spacer on the yellow axle between the black piece of the front linkage and the grey part
In step 179, we joined the red beam using a technic 1/2 pin in the hole adjacent to where the red axel is inserted (instead of joining it with the red axel, which appears in subsequent steps not to be joined together).
DeleteI just finished building the set with my son and I feel like I need to add a point on the tilting swashplate issue.
DeleteAs a helicopter maintenance engineer (one of the main reason for me to have the set), I am happy to say the tilt is faithfully realistic, although usually the main gearbox is the one that is tilted about 5 to 7 degrees forward, along with the main rotor rotating shaft and the swashplate.
This forward tilt of the main rotor rotating plane, allow for a horizontally level helicopter fuselage in forward flight.
Anonymous > Exactly! Step 179 is the right point where the problem is. Thanks !
DeleteTwo thoughts on this.
ReplyDeleteOne, I agree somewhat on the color scheme: too many colors, too busy, too broken up. I don't like red, and therefore red parts tend to just languish in my collection, unused, but I still think that all of that body work that is black should be red. Plus, white-red-neon yellow would be pretty close to some photos of real Airbus rescue helicopters I've seen.
Two, I'm curious whether the cyclic works the way a real helicopter cyclic does, or like the idealized description? The idealized description is that pushing the handle forward results in tipping the swash plate forward, which results in greatest angle of attack and therefore greatest lift when the blades are over the tail of the helicopter and the least angle of attack and lift when the blades are over the nose, which causes the entire rotor to tip forward, which causes the helicopter to move forward.
But that doesn't account for the motion of the helicopter. The blade on the side sweeping forward will have greater speed (rotor speed + helicopter speed) and therefore greater lift while the blade on the side sweeping backward will have speed of rotor speed - helicopter speed, and therefore less lift at the same angle of attack. So a real cyclic basically offsets the swash plate movement 90 degrees from the direction of travel. Push the stick forward, and instead of the back of the swash plate going up and the front down, the leading side (I think that's traditionally right side?) goes down and the trailing side goes up, because highest angle of attack on the trailing side and least angle of attack on the leading side is what produces the greatest lift at the rear and the least lift at the front (and the lift on the trailing and leading sides being basically balanced out), once you take the rotation of the rotor and the travel of the helicopter into account.
So on this set, does pushing the cyclic forward result in the swash plate tipping forward, or sideways?
No, sadly it does not
DeleteIt does seem to offset it by about 45 degrees (In the correct direction, nonetheless), but I think it's just the design limitation at this point.
DeleteI realized after writing this, that in real life, the offset is considerably less than 90 degrees, but also variable depending on the horizontal speed of the helicopter. I'm not sure that either function (the slightly-off-alignment swash plate, or linking the amount of deviation to speed) would be practical as a purely mechanical linkage with Lego. Maybe once I take it apart, I'll see if a sensible linkage could be set up to do it at all (nevermind trying to fit it into a helicopter).
DeleteI also found there was a mistake in step 179. Does anyone know how to fix this?
ReplyDeleteJust put the red 5x1 beam UNDER the red 1/2 axle ... see f.e. step 190, there is a clear view of the section.
DeleteNo, red axle mush go into the red piece.
DeleteI found the same problem , the initial build shows the 1/2 axle going through the 5x1 beam ,but if you look closely in later images the beam goes under the axle and the axle can be seen on top of the beam , putting the axle on top of the beam levels the swash plate and centres the control stick .. If you had a spare black connector you could add it to the hole below in the 5x1 beam and connect the toe pieces together rather than the beam floating in the space .
DeleteHas anyone ever seen that the blades pitch is backward ? I tought I did something wrong while building it but in every review video I have seen, the blades don't have the correct angle. It looks like the rotor should turn anti-clockwise instead of clockwise (when looking at the top). To correct this, I have rotated the 5 black 1x2 pieces 90 degree counterclockwise on the yellow shafts at step 611. Now the blades, when lever is pulled up, send air downward.
ReplyDeleteWhat do you think ?