

The ever-expanding LEGO® Technic "mid-scale car" line-up has been expanded
with yet another entry; this time it's McLaren Formula 1. Coming 1 March 2022, this 1432-piece set retails at 179,99 EUR / 179,99 USD / 159.99 GBP/ 239.99 CAD / 279.99 AUD. What will it offer in looks, playability, and especially elements?
If you are buying this set please consider using our affiliate links, New Elementary may get a commission: Set 42141 at the LEGO Shop
New moulds
The set introduces four new moulds: three of which complement existing moulds, and the fourth should be extremely useful for structural stability.
The set comes with 3 of each, all in Black (6362554 | 80271 and 6362555 | 80272).

As you can see, the new panels have a single mounting point, contrasting with the two on the older part. This may have been intended to give the panels a more aerodynamic shape and thus the possibility of being used as winglets or rudders.

Because there's only a single mounting point now, it had to be changed from a pin hole to an axle hole, to prevent the part from freely rotating.

Here's another expansion to a range of panels and this time it's the smallest Technic panel ever: a 1-module-wide version of Technic Panel Fairing 2 x 3 x 1 (71682), which was introduced last year. Extrapolating the name, this new mould could be called "Technic Panel Fairing 2 x 1 x 1". The set comes with 4 of these in Blue (6385238 | 89679).

You can see here how this "comma panel" integrates with the rest of the 2-wide panel family.

Interestingly, this mould can be used as a single-direction cam. In the assembly above, I can freely rotate the brown axle clockwise to have the yellow "piston" move up and down, but counter-clockwise rotation is blocked. Also, during rotation, the panel pushes the piston smoothly upwards but abruptly drops it. I can also see it used as a pawl in ratchet mechanisms.

I saved for last what is in my opinion the best: the McLaren introduces a new member of the Technic frames family, this time with dimensions of 19 by 3 modules. I guess one name for it could be "Technic Beam Frame 3 x 19 Open Center Thick". The set comes with two of these in Black (6377025 | 67491).

This is one of the longest Technic parts, longer than the frame 11x15, and as long as the Technic "baseplate" of 15x19 modules.
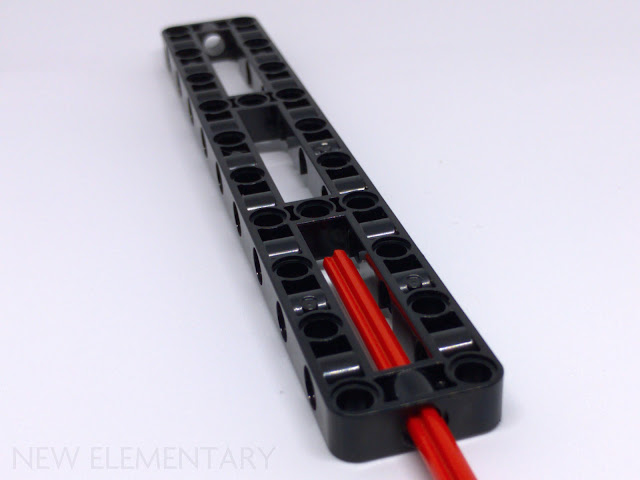
The frame has two cross-beams in the middle to enhance rigidity. While the added strength is welcome, they block axles to run through the length of the part. Each cross-beam does have a hole in it for extra mounting possibilities, but it's perpendicular to the length of the part and not longitudinal.
Parts in new colours
I'm very glad to see lots of existing moulds in new colours and, best of all, they are "regular" colours like blue, black or orange. For MOC purposes, I always prefer to see many moulds in few basic colours than few moulds in many "exotic" colours.

42115 Lamborghini Sián FKP 37 introduced two tapered curved panels, and here they appear in Black; one of each: Technic Panel Curved 5 x 13 x 2 Tapered, Left (6390391 | 67142) and Technic Panel Curved 5 x 13 x 2 Tapered, Right (6390393 | 68196).
Technic Beam 3 x 5 Thick [90° Offset Centre Beam Holes] , also known as "dogbone", also appears in Black (6390379 | 14720). The set comes with 4 of these.
Finally, Technic Axle Connector Hub with 3 Axles at 120°, or, as I call it, "Technic shuriken" was previously available only in light bluish grey. The McLaren comes with 2 of these in Black (6390386 | 57585).

Not all the above Blue parts appear for the first time, but they're really rare.
We can find again Technic Panel Curved 5 x 13 x 2 Tapered, Left (6390392 | 67142) and Technic Panel Curved 5 x 13 x 2 Tapered, Right (6390394 | 68196). The set comes with 2 of each.
The "quarter-cylinder" family welcomes new blue members: Technic Panel Curved 7 x 3 with 2 Pin Holes through Panel Surface (6391882 | 24119) and Technic Panel Curved 11 x 3 with 2 Pin Holes through Panel Surface (6390387 | 62531). Two of each are present here.
42123 McLaren Senna GTR introduced a lot of blue parts, which until now were unique to that set. Three of them make their return here, two of each: Technic Panel Fairing #5 Long Smooth, Side A (6330921 | 64681) and Technic Panel Fairing #6 Long Smooth, Side B (6330920 | 64393).
Technic Panel Fairing 2 x 3 x 1 (6331025 | 71682) was also introduced in 42123 and also two are included here.

Orange also gets a big boost, with 10 moulds debuting in this colour. Many of these come in small quantities, but they're very visible in the final model: therefore, they'd look extremely ugly in their old colours.
Perhaps the most significant of these recolours is Technic Beam Frame 5 x 7 Open Center Thick (6390599 | 64179). Two of these are in the set.
A trio of small connectors comes next: 1 x Technic Pin Connector Hub with 1 Pin with Friction Ridges Lengthwise [Square Holes] (6390390 | 65487), 4 x Technic Pin Connector Hub with 1 Axle (6391881 | 22961), and 1 x Technic Pin Connector Round 1L [Beam] (6390380 | 18654.
Technic Wishbone Suspension Arm previously existed only in black, but this set comes with one in orange (6390389 | 32294).
Unlike the last mould, Technic Axle and Pin Connector Perpendicular 3L with Centre Pin Hole has been available in several colours before, but never in orange (6390382 | 32184). Two of these are in the set.
4 x Technic Beam 1 x 6 Thin (6390381 | 32063) are present here, as well as 2 x Technic Beam 3 x 0.5 Liftarm with Boss and Blocked, Squared Pin Hole (6391883 | 61408).
Finally, I was surprised to know these hinges weren't available in orange before: Hinge Plate 1 x 2 Locking with 1 Finger On End, without Groove (6266212 | 44301b) and Hinge Plate 1 x 2 Locking with 2 Fingers on Side, 7 Teeth (6390385 | 50340), two of each.
Other parts of interest
Besides the new moulds and new colours, this set brings a lot of other interesting elements.

These orange parts aren't new, but are noteworthy for their rarity.
Technic Panel Fairing #5 Long Smooth, Side A (6358254 | 64681) and Technic Panel Fairing #6 Long Smooth, Side B (6358253 | 64393) were only available in 42126 Ford F-150 Raptor, and the McLaren includes 2 of each.
This set also comes with 1 x Technic Panel Fairing 2 x 3 x 1 (6358255 | 71682), which previously appeared only in the aforementioned Raptor and in 42120 Rescue Hovercraft.
Technic Axle and Pin Connector Angled #6 - 90° (6390383 | 32014) isn't new in orange; on the contrary, it's been around since 2002. But it only came in sets in small quantities, and was never seen since 2004. The Formula 1 still only comes with 2 of these, but they're still a welcome return.

Technic Pin 1/2 with Friction is very new, having appeared in 42134 Monster Jam Megalodon and two System sets. It comes in red (6378120 | 89678) to distinguish it from the older version, which is either blue or light grey.
Unlike the old version, and as its name implies, this half-pin has friction. Perhaps you can see the small ridges in the photo above, which are absent in the old, grey version. This allows it to remain in its hole without rotating, which should be really useful to prevent parts attached to its stud from spinning around.

Tyre 81.6 x 44 R (6199832 | 18450), nicknamed the "Tumbler tyre" from the set it first came in, appeared for the first time in 2014 but curiously no set came with more than two of these. Today that changes: 42141 is the first set containing four Tumbler tyres.

Finally, I consider these two noteworthy for different reasons.
The set comes with 1 x Rotor Blade 3 x 19 with 3 Holes in Black (6305550 | 65422), which previously were only available in 42125 Ferrari 488 GTE 'AF Corse #51' and "Unlucky 13" 42113 Bell Boeing V-22 Osprey. Those wishing to recreate that ill-fated set have now one more source of this propeller in black.
Plate Special Round 8 x 8 with 2 x 2 Center Studs with Groove also in Black (4205860 | 6177b) is quite common, and this set includes four more of these; however, I think it shouldn't. These are used as wheel covers, and are supposed to receive stickers representing the Pirelli markings on the real things. If you don't align the stickers perfectly, they'll wobble as the car rolls around and look terrible. This could be avoided if these discs were printed instead, and it's a shame the design team didn't choose this option.
Sticker sheets
As can be expected from a heavily sponsored race car, 42141 comes with lots of stickers. These are spread out between three sheets. I apologise in advance for the less-than-stellar photos: the sheets started curling and wrinkling shortly after taking them out of the plastic bag that also protected the instructions book.


These two sheets contain sponsor logos, detailing to help with the colour transitions, and details such as the controls on the steering yoke.

I personally don't like stickers for making part reusability for MOCs harder, but for the reasons I explained above, these I simply hate.
The build
The building process doesn't present many surprises. It's divided in 4 stages, where we first build the rear, progress to the front, then add skin and details on top.
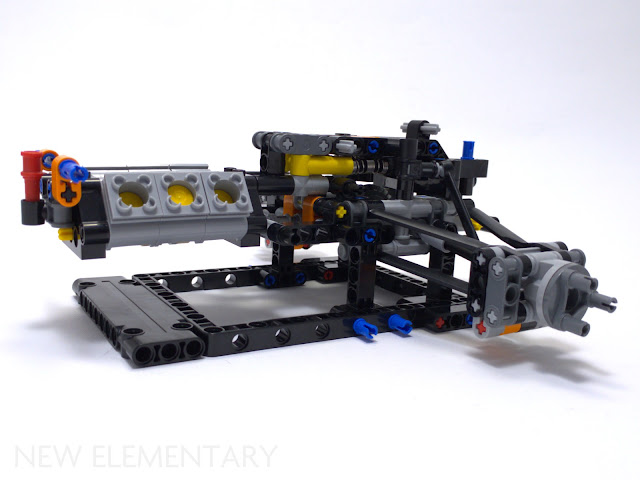
This is what you get at the end of bags #1. This hollow structure comprises the rear suspension and "transmission", if we call it that: I was surprised to see the V6 engine directly connected to the differential via a single 20T gear, nothing else. As can be expected from an F1 car, the suspension is of the pushrod type, with the springs mounted longitudinally inside the body.
Another thing we can already see is how hollow the finished model will be. This is only the beginning of it...
Bags #2 build the front suspension and steering, and connect them to the rear to make the full chassis.

I was intrigued by this quasi-illegal building technique: how are we supposed to put a 5.5L axle inside a 5-module-long opening in a frame? Fortunately, the exact part dimensions allow this without forcing anything.

Here is what I see as a critical flaw in the model, that will probably lead to permanent part damage. Even in the front suspension's lowermost position, the front springs are squeezed between other parts, slightly compressed. With time, I suspect they will weaken, with no way to return them to normal strength. What's worse, with the model fully assembled it's very hard to take the springs out to rest fully extended for storage.

Please don't make the same mistake I did: when mounting the 12T gear on the steering rack, I aligned its teeth in a way to have its axle aligned with the cardinal directions. The problem is that the steering mechanism goes through another pair of gears, which then leaves the steering yoke slightly to one side when the wheels are pointing straight forward.
The solution is to slightly rotate the 12T gear by one tooth right when assembling it in the steering mechanism; afterwards it's too buried inside the model to easily be taken out and realigned.

This is what the model looks after bags #2. We can now see how massively long the thing will end up being.

Among other things, bags #3 build the car's dorsal stabiliser. I read concerns about the geometry employed here straining the parts in unnatural connections, but everything went together smoothly without forcing anything.
And here is the result of adding bags #3 to the build. After the cold chills bags #2 gave me with that front suspension, these ones were a breeze.

Bags #4 have us build this dense and complex assembly for the inside of the overhead engine intake, using bars and 1x2 round plates. All this to have studs in opposite directions and with the correct spacing. Remarkable.

I find it weird that the rear-view mirror posts are attached this way, with no spacer part to exactly define how much these axles should be pushed in. A regular pin connector (62462) would do the job and look inconspicuous.

I don't remember seeing this on an official LEGO model: on step 331 and others, you have to push an axle only halfway in its receptacle.

Here is a small mistake in the instructions: they want you to mount the spoiler rotated 90º from its correct orientation. Not a big problem for the target audience of 18+, I guess, as the correct way to attach the spoiler can be deduced from the next step.
The completed model
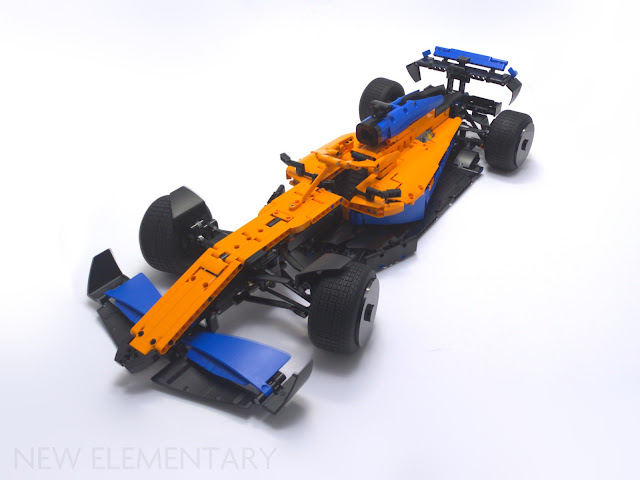
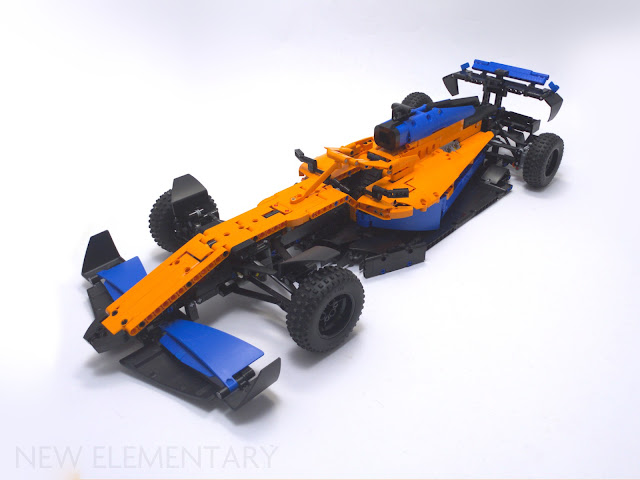
I'm indifferent to Formula 1 (so much that I was surprised to learn that nowadays only "puny" V6 engines are allowed), but I concede that this is a beautiful car, both in shapes and colours. That fact that it's clad in regular blue, orange and black, instead of weird, hard-to-MOC-with colours is a big help, too.

Given the limitations of Technic panels' shapes, I think there are no major gaps visible. The fact that the engine is visible helps with playability, too – just don't roll the car too fast if you didn't apply the wheel cover stickers with 100% accuracy.
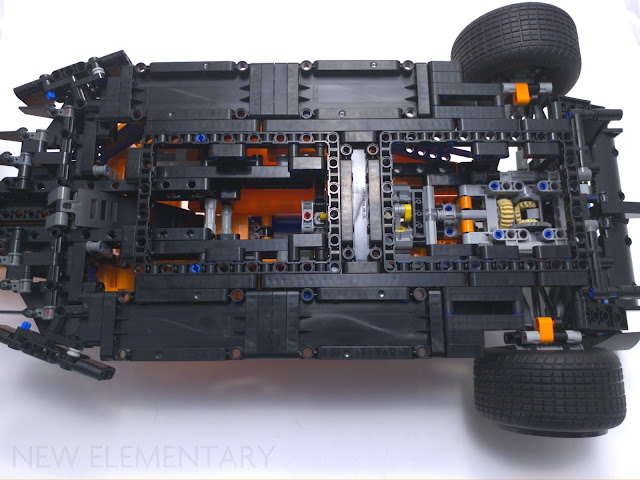
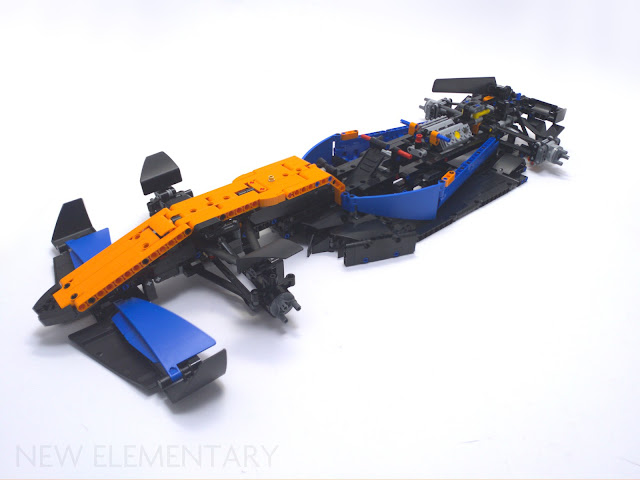
Here is the underside of main body. As you can see, the interior is cavernous, thanks to the lack of any large gearboxes or other mechanisms. It should be quite easy to stick some electronics in here and adapt the model for remote control.

Also, these close-up shots show why it was needed to have so many orange recolours of previous colour-locked moulds, such as the suspension arm (in the halo) and the 5x7 frames (along the top of the car's nose): they'd stick out like sore thumbs if they had their original colours.

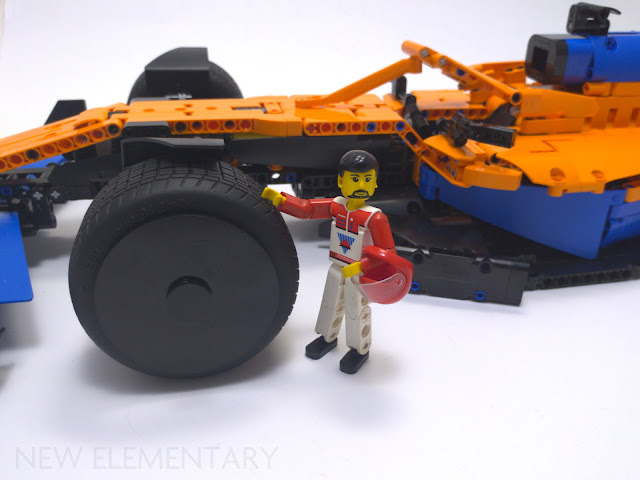
Is this set techfig-scale? Well, if you pretend the techfig is a kid messing in his father's car (no, that's not a moustache on a kid. You're seeing things. Move along), then maybe it's in scale.
Is it an F1 car or a monster truck? Why not both?

Since 42126 Ford F-150 Raptor came out, some people have complained about the choice of tyres, and suggested that Tumbler tyres would look better. The McLaren presented an excellent opportunity to test this hypothesis, with four such tyres in a single set, eager to be transplanted into an off-road vehicle. Well, I can say that Raptor looks a lot better with these fat chunky tyres, but using them effectively would require an extensive rework of the suspension: the tyres scrape against the wheel wells when the suspension is pressed down or the front wheels turned, and all the time against the wheel hubs.
If the Raptor's wheels are vacant, why not trying out them on the McLaren, to give it a more rugged look? Well, maybe it could pass off as a Mad Max-esque contraption, if only the tyres were bigger... at this size, they look ridiculously small and narrow. They're still barely large enough to allow the car to roll without scraping the bottom, as long as you don't press down on the suspension, so at least there's that.
The B-model
"B-model"? What is this "B-model" you speak of? To be honest, there's not much you can make that's interesting from a mechanical point of view from a set that has 1432 parts, only 9 of those being gears (and I'm being generous by considering the differential and steering rack as gears). Yet, I don't doubt "alphabet-model builders" like Milan "grohl666" Reindl will manage to turn this set into something unexpected.
Conclusion
Comparisons to 42000 Grand Prix Racer, the last Technic F1 car at this scale, are inevitable. The older set's looks are a lot less refined and detailed, but it has much more interesting (even if some of them unrealistic) mechanisms, hand-of-god steering, and, oh my, a B-model.
From a parts perspective (and that's what New Elementary is all about, after all), it's a tough call. More panels in more modern colours versus more mechanical components? The fact that the older set is long retired, and therefore vulnerable to inflated prices (unlike the McLaren's $179.99/£159.99/€179.99), can also be a factor. Unless you're after something specific the McLaren offers, the non-licensed car might give you more stuff to work with, as long as you can find it for a decent price.
Ignoring the older set, what can I say about 42141 McLaren Formula 1 Race Car? It's a good pack of Technic panels in useful colours, and the number of racing suspension elements, such as wishbone arms, can also attract car builders. It also looks gorgeous on a shelf or hanged on a wall: the striking colour scheme a big help here.
On the other hand, it has the bare minimum functions for a Technic car: cylinder engine, suspension, and steering. These bare minimum functions use the bare minimum of gears, which make the car basically an empty shell. The long-term damage to the front springs is something inexcusable in any Technic model, much less an official one. On the other other hand, this empty shell means lots of room for remote control modifications.
In summary: get this set if you want to bolster your panel collection, want a pretty decoration, or want to tinker with modifications. Don't get this set if you want to bolster your gear collection, want to learn interesting mechanisms, or worry about damaging parts.

Hear that engine purr!
If you are buying this set please consider using our affiliate links, New Elementary may get a commission: Set 42141 at the LEGO Shop
READ MORE: LEGO® Speed Champions 2022: Interview with Christopher Stamp
Help New Elementary keep publishing articles like this. Become a Patron!
Massive thanks go to our 'Vibrant Coral' patrons: Rebranded, Chuck Hagenbuch, Joe Fontana, Elspeth De Montes, Megan Lum, Markus Rollbühler, Mevits Bricks, Baixo LMmodels, Andy Price, Anthony Wright, London AFOLs, Gerald Lasser, Big B Bricks, Dave Schefcik, David and Breda Fennell, Huw Millington, Antonio Serra, Beyond the Brick, Sue Ann Barber & Trevor Clark, and Kevin Gascoigne. Vale Iain Adams, a great supporter of New Elementary.
LEGO® Shop at Home
USA: Save up to 30%. See what's on sale!
UK: Free delivery when you spend £50 or more at LEGO!
Australia:
Discover the latest promotions and offers on LEGO.com
All text and images are © New Elementary unless otherwise attributed.
Good review!
ReplyDeleteWhile I'm generally a fan of stickers (which often allow more vivid colors on dark parts, more varied decorations, plus the ability to easily leave them off for MOCs), I agree with your issues with the wheel covers. Round stickers are some of the hardest to apply correctly and consistently (with the proper ~1mm margin on all sides), and the bigger they are, the more of an issue that can be. And while it's not necessarily an issue with the base set here (where the rotational position of the sticker doesn't make that much of a difference), having them oriented identically can also be a challenge. For four matching wheel covers here, printing would've probably been a smarter choice. Granted, I have also seen people upset with the choice of tire brand represented, so stickers do allow those people to leave the stickers they don't prefer off.
The new panel pieces look neat and I appreciate your exploration of how the smallest one can be used mechanically instead of just as a small decorative panel.
Pedantic time: Wishbone arms exist in lots of different colours, including bright light blue. There's lime ones in the Sian. https://www.bricklink.com/v2/catalog/catalogitem.page?P=x136&name=Technic%20Wishbone%20Suspension%20Arm&category=%5BTechnic%5D#T=C
ReplyDeleteThat small Technic fairing will make excellent toilet paper when it comes in white
ReplyDelete1x3x1 doors aren't terrible for that.
Delete1x3 doors work but they run a little long, their 1-brick high dimensions can make them a tight fit in some spaces, and the handle can look a little obtrusive depending on how you hang it. This is a lot more compact, with only one module of width and one module hanging from the "roll" itself. Would work great doubled or even tripled up for larger types of paper rolls (like paper towels or gift wrap) as well!
Delete@David Hensley right, but I think these pieces will look better for the exact reasons that Andrew described
DeleteThis set had an axle halfway into its port: https://www.bricklink.com/v2/catalog/catalogitem.page?S=40335-1&name=Space%20Rocket%20Ride&category=%5BLEGO%20Ideas%20&#T=I
ReplyDeleteI recommend this discussion re: compressed springs losing function: https://arstechnica.com/civis/viewtopic.php?f=23&t=996111
ReplyDeleteEssentially, a well engineered spring shouldn't lose much at all in constant compression. The cycling of the spring is more detrimental than the compression.
"Technic Axle and Pin Connector Perpendicular 3L with Centre Pin Hole" in orange appeared before in an obscure old theme called BIONICLE. However, "Technic Liftarm Thin 1 x 2 - Axle Holes" is new in orange. It's great to see "Technic Axle Connector Hub with 3 Axles at 120°" in black. I've wanted that recolor for a while now as it's very useful for angling parts in large-scale constraction.
ReplyDeleteLovely review! While I'm not really much of a Technic builder (my family has gotten a few Technic sets over the past few decades which I've helped build, but mostly when we've been lucky enough to find interesting ones at a reduced price), I'm a big fan of the theme's design language, especially since the modern system of Technic panels first debuted in some of the 2008 Bionicle vehicles.
ReplyDeleteAnd as somebody who sometimes struggles with the "mechanical engineering" side of building, I am regularly in awe at designers' ability to both build models with authentic functions and to efficiently pack those functions into a tight space!
Honestly, I would probably question the utility of 80271 and 80272 if not for how many uses of them the designers demonstrated even in just this one set! They are put to great use for the front and rear wings as well as the fenders over the front wheels.
The 1x2 "Comma panel" 89679 is a very cute new part as well, which I could imagine being used for a lot of cosmetic features where previous Technic sets would have been reliant on System curved slopes. And yet it definitely has its share of uses that System-based curves would not. Besides the very clever mechanical use that you pointed out, I can also imagine the inside curve of this piece and its 2x3 older cousin being useful as the blade of a road grader in a LEGO City road construction set or MOC.
It could also make a great air intake/vent by stacking multiple ones with the thin end facing forward, and I can't help but wonder how it might look as a mechanical claw on a robot, mech, or spaceship. Even just combining it with matching 2-module-wide panels as you showcased with some of the orange panels from this set could be a nice option for creating decorative patterns on vehicle bodywork without having to rely entirely on printed or stickered detail. Clearly, its uses far exceed its connection points!
I'm sure the black 120-degree triple hub is going to be an EXTREMELY popular recolor for all sorts of builders, since that part is a very useful connector for a lot of Technic and System builds alike, and a black one might be useful for some uses where a grey one might have been a little too obtrusive.
I generally like stickers, but it is pretty awful seeing what happened to yours shortly after they came out of the package. I don't think I've ever seen this happen to a sticker sheet I've gotten, and I hope it doesn't become a widespread issue. If it does, LEGO might have to revisit the type of adhesive they used here or the supplier they get it from (since I can't imagine that any sort of sticker paper would spontaneously warp like this on its own under normal conditions).
Thanks for the detailed review!
Nice review, thank you!
ReplyDeletePS what happened to Purple Dave? He used to be all over the comments, but I don't think I've seen a comment from him in a while. I don't know them from anywhere else, just curious I hope they're doing ok.
ReplyDeletePurple Dave still seems to post comments quite frequently on Brickset, as far as I know.
Deleteintrigued by daddy's smallest special technic panel son, but the real test is when it will be used as roof detailing in a ninjago set
ReplyDeleteThis comment has been removed by a blog administrator.
ReplyDeleteThis comment has been removed by a blog administrator.
ReplyDelete