Build review: 11381 Jaguar E-Type from LEGO® Icons
Posted by
Kev Levell
The Jaguar E-Type is a paragon of British automotive design. It was revealed to the world in 1961 in legendary "a race for the finish line" style. It had an impressive reception at the Geneva Motor Show where it was appreciated not only for its looks but its technical innovation and capabilities. The E-Type subsequently became part of the visual make-up of the "Swinging Sixties". Like lava lamps, Andy Warhol, The Beatles and the space race, it helped define a groundbreaking era.
Following in the tyre tracks – or more appropriately, the optimal racing lines – of other LEGO® Icons vehicles, this lean green driving machine has a lot to live up to. I’m hoping, like its real world counterpart, the LEGO 11381 Jaguar E-Type will delight and impress in both looks and construction.
We were given this product by The LEGO Group; the author's opinions are their own. This article contains affiliate links to LEGO.com; we may get a small commission if you purchase.
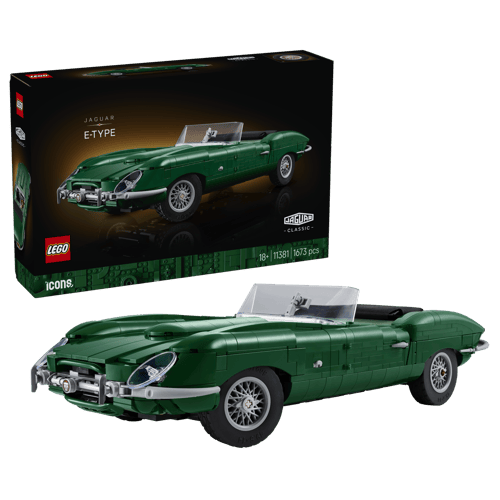
11381 Jaguar E-Type
Release date: 1 August 2026, pre-order available now from the links below
The latter introduced a lot of parts in dark blue, and as you saw in my new parts analysis of the LEGO Jaguar yesterday, the E-Type has pulled off a similar feat in dark green!
Preface: Design of the E-Type
Jaguar based the E-Type on their Le Mans race car D-type that had won the 24hr race from 1955 to '57.
For the time, the design was unusual, inspired by the aerodynamics of aircraft and all calculated by hand, long before the invention of wind tunnels! Holding to the ideals of the company slogan "Grace... Space... Pace...", the Jaguar E-Type's form followed its function and produced something successful, beautiful and very fast.
The 1955 Le Mans winning Jaguar D-Type. Attribution: David Merrett from Daventry, England, CC BY 2.0, via Wikimedia Commons
The innovations made throughout the vehicle would revolutionise the way sports cars were made.
A monocoque passenger compartment bolted directly onto a front subframe, which supported the engine, made for a lightweight structure.
The 3.8 litre straight-six engine delivered enough horsepower to achieve speeds of up to 150mph (240km).
A balance of looks, performance and speed all came together in, what was for the time, a comparatively affordable sports car.
These factors probably contributed to its impact in popular culture, making it the must-have vehicle for hip celebrities, sealing the timeless appeal of the car, which is perhaps underlined by the production of this LEGO model over 65 years later.
The E-Type was available as a coupé and a roadster. In an unusual move from LEGO Icons, the car depicted isn't just a make and model interpretation but a recreation of a specific individual car: '77 RW' was one of the launch cars presented at the 1961 Geneva Motor Show. In a recent Instagram post, senior designer Đặng Hoàng explained it was the retractable roof on his concept model that inspired Jaguar to suggest the 77 RW as the precise subject.
This car, only the third vehicle off the production line, made an overnight journey from the factory in Coventry all the way to Geneva to be presented to the world's automotive press. It arrived in time, and history was made!
Now, let's make a little bit of history ourselves...
The build
The first thing to mention is that there's no sticker sheet: all the necessary details will be produced by a limited number of printed elements, the new parts and the ingenuity of the methods used in its construction.
The steering mechanism is similar to the construction used in the Shelby Cobra but it has been slightly modified and adapted for use here.
The 18x chunky slopes (7527) are all used on the sills, creating the underside of the smooth, rounded monocoque tub.
The build process was fairly straightforward to begin with. Quickly though, this moves into much more complex territory as we begin building the front nose / mouth section.
Here we place brackets on top of brackets on top of jumper plates in order to space and distribute a mind boggling array of studs pointing in every direction.
From the way the nose section is connected, I see that there is some attempt here at replicating the attachment of the front subframe of the real car to the monocoque passenger compartment.
A well hidden and simple scissor mechanism allows the front section of the E-Type's bonnet to tip up, giving realistic access to the engine.
Curved U-shaped bars (7052) support the engine block, and I think this is a pretty reasonable depiction of the inline-6 engine, too, although I'm not sure about the usage of those rare dark tan plumes for the manifolds, as they seem a bit thin. I can see why this may have been the only option given the enclosed space and I don't have a better suggestion. Although, a 1x2 right-angled bar (a half-brother to the 7052) would certainly be something I'd love to have in my tool box of LEGO parts!
Another complex arrangement of clips, brackets, bar holders and plates forms a framework to support and help shape the rest of the bonnet.
The central section of the bonnet uses a familiar bracket technique to allow some side on construction that creates the bonnet louvres, here depicted almost perfectly by a stack of three profile bricks on each side.
This section of the build is attached using only bars and clips and creates a shallow angle that finishes in a gentle curve down to the nose/mouth. That curve down is formed by five 2x8 curved slopes (42918). The long curves are stepped back at either side in an attempt to realise the smooth rounded forms at the front edge of the car.
More brackets and side-on constructions produce the underpinnings for the front wings and wheel arches. The forms of the wings of the real car make it necessary for this to be relatively thin above the wheel.
Staggered rows of curved bricks create the upper curvature of the wing.
A neat sub-assembly (above right) on each side tackles the difficult interface at the corner under the bumper.
A 1x3 inverted tile with hole (35459) and a bar-to-clip attachment method allow mounting the top of the front wing at an angle that creates the subtle profile of the front wings.
The doors also use a novel approach with a similar hidden bar clip attachment method, allowing the top edge of the door to be set at a slight angle too.
Unusually, both doors are constructed together on this sub-assembly with a central wall. I think this confirms my suspicion that this LEGO recreation is attempting to match the construction of the actual vehicle as closely as possible; replicating the monocoque division of the passenger compartment of the actual car from the subframe that supports the engine block.
When the doors are attached, there is a neat continuance of the arch of the front wing/bonnet that mitigates some of the appearance of those stepped curves.
Construction of the rear underside is managed with a familiar stud-reversal technique: clip plates inserted into what I call the "sandwich bar", a.k.a. Brick Special 1 x 2 Rounded with Center Bars (77808).
The boot section beyond the rear axle is then attached and locked into place behind the seats.
Eventually we get to add the lovely instrumentation panel. I have learned that this is not just a dark orange steering wheel, but a laminated mahogany steering wheel no less, with an E-Type logo centre boss cap. Either way, it is nice to see that the car is a right-hand drive too! Although, having converted left-hand drive LEGO cars in the past, I'm sure it would be a relatively easy procedure to "fix" this if you wanted.
I want to highlight the fineness of the silver print. It's really detailed with all the gauges and switches, and to include the detail of the polka-dot screen pattern (another distinctive feature of the early Series 1 E-Types) feels like a step-up in quality.
The instructions claim that the map tile is intended to represent the journey from Coventry to Geneva for the launch of the E-Type. I hate to nit-pick this but I don't think this map looks quite right! I don't understand why this isn't cartographically accurate because this is a new print made for the set. It's not something that I will lose sleep over; it's just a bit confusing, unless of course the UK and Europe got some geographical reshaping while we were all sleeping and I need to go back and re-learn this.
A lattice of LEGO Technic parts underpin the soft-top. Deployment is direct by hand and, as authentic and appropriate as this is, there is something I don't like about it. I was cautious about catching the open rear window, or creasing the fabric, and generally – despite the firmness of the LEGO Technic frame – something felt a little too delicate about this. At least we don't need to move the seats, like in the real thing.
Between the boot space and the seats there is a significant void that will house the soft top when it is stowed away.
More methods to tip the body work from the usual 90° are employed here at the rear, utilising the angled bar present on the strange opera-glasses Technic connector element (85940, 29173).
The light bluish grey microphone lurking there is the top of the button that opens the boot lid. This is activated from below.
There are a surprising number of instances in this set where we attach elements upside down. At the bottom rear quarter we have a brick with clip to reverse the direction of the build ,and another small sub-assembly using headlight/Erling bricks to continue some side-on construction.
Yet another sub-assembly for the rear wing tops also has a central connecting section.
The boot lid uses that nice printed panel with the Jaguar name badge.
I found locating the connection points a little bit tricky as the LEGO Technic axles on the boot lid are free to rotate independently, as are the axle hole connections within. I needed a couple of attempts at this, which involving some stopping to realign each side of the connection.
Reasoning for the new wheel arch became clear to me when I saw how closely the arch had to fit over the tyre. It really is very tight on space!
The headlight uses an oval minifigure shield (92747) recoloured in trans-clear with a nice rim print. It is attached to the lurking lamp holder (4081b, 41632) via a nipple (20482, 31561) and my favourite element, the ring pop (5264).
The finished model
The opening of the soft-top is pretty pleasing, but I fear wear and tear on this fabric part, even if it is the most appropriate approach.
As noted above, the boot opens by pushing a "button" located on the underside of the boot area.
The distinctive clamshell bonnet, where virtually the whole front half of the car hinges forward to allow engine access, is perfectly executed.
Both doors open and there's space in the boot for the tool kit. Oh, and it has working steering, as previously demonstrated.
Accuracy and other considerations
The depiction of an actual individual car – in this case, the 77 RW launch car – is an unusual decision for a LEGO Icons set, but not unheard of (looking at my still-beloved 10300 Back To The Future Time Machine sitting on a nearby shelf).
Overall, the accuracy of the shape is pretty remarkable, given the medium of building blocks. Most of this is only possible with LEGO bricks today because of the many new sexy curved elements that have been introduced over the last couple of years. However, I feel that there are a few details that don't quite work.
The front face of the car has attempted to replicate the clear oval mouth opening of the radiator grille and I'm not convinced the two snowboards do quite enough to capture the cute surprise of the "ooh" that I always imagine the Jaguar is mouthing.
The logo-adorned equator line is thinner and more recessed in the actual car. I would have also really appreciated the front indicators being included as prints on the curved slopes (6929 & 6930) just above the bumper.
From the rear ¾ view, perhaps the biggest issue is that this seems a little wide; it's probably an impossible task to better replicate the curved taper in at the sides and maintain the integrity of the overall smoothness.
There are surprisingly few gaps which, it must be acknowledged, really does aid the impression of a streamlined vehicle.
From the plan and side projections of the E-Type, the accuracy of the forms can't be denied...
...but, this is a car that sizzles in the ¾.
I think I'm happy to concede that attempting a car that is so rounded and streamlined was always going to involve a lot of compromises. On the one hand, the overall shapes are clearly there, judging by the comparisons in the side and plan views; on the other, it fails to convincingly recreate the important detail of the 'open oval mouth' in the front to front-¾ views.
Perhaps this is no more inaccurate than the 10357 Shelby Cobra, and I do think it's impressive how the LEGO design team has handled the smooth aerodynamic forms of the E-Type overall. It was an ambitious undertaking, even with today’s curves and slopes at their disposal.
My major remaining criticism is with the headlights. Compared to the headlight covers on 77 RW (and the Series 1 E-Type in general), I think the parts used are too flat, too narrow and overhang the bumper in an inaccurate way. I applaud the novel usage of the minifigure shield , however, when something just doesn’t look right, it's difficult to ignore it.
Minor MOD
I couldn't un-see the part as the flat shield (albeit transparent) and I felt compelled to do something that I rarely do with official sets – try to "fix" it!
I felt there was a part currently in production that is a better match for the shape of the headlight. Disc Oval 4x6 (7688) was introduced earlier this year in 42224 Porsche 911 GT3.
The part is closer to 3x4 in dimensions and I don't think it’s domed enough either, but in the place of a new specialised part that would probably require a left and right variety, I think it is close enough. The stud attachment points and support fins make me think of headlight bulbs too.
It’s actually a very simple adaptation if you, too, prefer how this looks.
I thought I needed to reverse the studs and was using too many parts trying to do that when my son chipped in with a “just keep it simple”.
He stuck a round tile with vertical bar (20482) on top of a positioning stand part (65578) and fitted that into one of the hollow studs on the 7688. His alternate sub-assembly for the headlight fits into the existing construction. Voilà!
I apologise to the Design Team for the audacity in presenting my "solution" to this, but modifying or subjectively improving models is one of the things that playing with LEGO bricks is all about in my opinion. I think the ability to change this set in a way that I am happier with is a good thing, and weirdly, it adds to the appeal for me.
The scalloped recess of the Series 2 open headlights would have been much harder to convincingly realise; probably impossible with the currently available parts. So the covered headlights are a better choice, and I believe are the preferred option for many fans of the car too.
Could a better result have been achieved with a new curved slope or domed element? A bigger version of the quarter dome brick 5848, or an oval similar to 7871 but smaller, or a piece more closely resembling the overall required shape but decorated like part 1871 in 76911 Speed Champions DB5? Would that qualify for criticism as being too specialised? Would it have significantly improved the look for the inevitable additional cost?
Conclusion
Right from the start, British Racing Green was absolutely the correct choice of colour for this car, especially as it has introduced such a healthy batch of new parts in that hue.
The set has a lot to offer, to precis our parts analysis: 3 new moulds, a windscreen, a wheel arch and a wheel hub, 7 new prints, a new fabric piece, 19 recolours, a reintroduction, 17 notable rare parts and more besides. In short, it's stocked full with great stuff!
As a kid, I loved car design. A couple of my favourite classic cars have already been adapted into LEGO form, but for British '60s sports cars (and this is heresy I know) the E-Type wasn't a particular favourite of mine. I preferred the old MG MGA and MGB, the Austin Healey 3000 and the Triumph Spitfire.
The E-Type is still iconic in my eyes, but I couldn't pretend to have the love for it that I know others do. That probably makes me more forgiving of inaccuracies than I might otherwise be.
With my LEGO fan hat on, most of the boxes are ticked: great new parts, an engaging build with clever little construction techniques and a very reasonable representation of a vehicle that really does deserve the title of "icon".
With the interests of automotive fans in mind, I think the headlights and the oval mouth that are of the greatest concern.
If you're specifically an E-Type fan, I think that the inaccuracies here might be too great to overlook. Although, this is a LEGO model, and 100% accuracy isn't necessarily what this product is providing.
There are a plethora of die-casts, model kits and replicas, produced in every scale and imaginable colour that one could possibly wish for. These products do provide the exacting kind of detail that is always going to be beyond the scope of a LEGO model, if you don't already own one or more of them, perhaps that is where your money would be better spent.
The balance that must be struck when making a LEGO model like this is a tricky one; the model must be recognisable at the chosen scale without too many new specific parts. In reviewing a set like this there must be a balance too; acknowledging what was not possible against what has been achieved.
It's a close one, and I'm sorry to say that on careful consideration, I don't like the headlights. Were it not for that, I could accept the mouth. In all other respects, I'm actually incredibly impressed with how accurate, smooth and streamlined this model is at replicating the complex sweeping curves of this beautiful car.
As I discussed in the parts review of this set, the price per gram is 7.4 pence and the price per part is 7.8 pence. That makes it good value, undeniably. Add to that the quality of the build experience and the fidelity of the final model, and I can only reiterate that this is a set that is well worth the money.
Will you be buying this vintage viridian vehicle , and if not, what classic car would you like to see honoured in LEGO form next?
For me, my top choice would be the Ferrari Dino 246 GT. I could also be persuaded to test drive a Mercedes 300SL Gullwing or a (lack of curves) curve ball of a Golf GTI MkII, or maybe even a BMW M3 E36. Whatever the future holds for the next vehicle in the LEGO Icons theme, the past is sure to provide some inspiration!
Help New Elementary keep publishing articles like this. Become a Patron!
A huge thank you to all our patrons for your support, especially our 'Vibrant Coral' tier: London AFOLs, Antonio Serra, Beyond the Brick,
Huw Millington, Dave Schefcik, David and Breda Fennell, Gerald Lasser, Baixo LMmodels, Sue Ann Barber and Trevor Clark, Markus Rollbühler, Elspeth De Montes, Megan Lum, Andy Price, Chuck Hagenbuch, Jf, Wayne R. Tyler, Daniel Church, Lukas Kurth (StoneWars), Timo Luehnen, Chris Wight, Jonathan Breidert, Brick Owl, BrickCats, Erin and Dale, Jake Forbes, H.Y. Leung and our newest top-tier patron, Keith Marcelletti! You folks are better than inverted cheese slopes.
I'm almost certain that the same connection method would work. I think a boat stud might be too small though, the shield felt like it needed to be a bit wider to comfortably cover the open area.
I'm sorry but this is just...not good looking. It doesn't help that the E-Type is one of the most beautiful cars of all time, so recreating it in bricks was always a tall order.
But sheesh, the headlamps SHOULD NOT overlap the bumpers. If they had got the front of the car right, much else could be forgiven, but it's just so ungainly and wrong. Surely they could have found the budget for a new mold for the headlamps.
The elliptical radiator opening is likewise pretty bad, it is an integral part of the front end, blending smoothly from the corners and the bonnet. The chrome crossbar exists flush with the opening, set within the oval. Compare to the Lego version that doesn't even form a nice ellipse, and has the gray metal crossbar out in front like it's a piece of the bumper, dominating the space and visually just wrong and interrupting the flow of the bodywork. Oof.
Sorry Lego, I love ya and I can excuse a lot, but sometimes it would have been better to skip a model than produce something as wrong as this.
It all hurts twice as bad because of the lovely Bugatti Type 35 set 4000048 that is limited to 250 sets and from all the pics looks wonderful I won't really ever be able to purchase.


.jpg)


I wonder if you could use 2654
ReplyDeletePlate, Round 2 x 2 with Rounded Bottom (Boat Stud) in trans clear for the headlights.
I'm almost certain that the same connection method would work. I think a boat stud might be too small though, the shield felt like it needed to be a bit wider to comfortably cover the open area.
DeleteI'm sorry but this is just...not good looking. It doesn't help that the E-Type is one of the most beautiful cars of all time, so recreating it in bricks was always a tall order.
ReplyDeleteBut sheesh, the headlamps SHOULD NOT overlap the bumpers. If they had got the front of the car right, much else could be forgiven, but it's just so ungainly and wrong. Surely they could have found the budget for a new mold for the headlamps.
The elliptical radiator opening is likewise pretty bad, it is an integral part of the front end, blending smoothly from the corners and the bonnet. The chrome crossbar exists flush with the opening, set within the oval. Compare to the Lego version that doesn't even form a nice ellipse, and has the gray metal crossbar out in front like it's a piece of the bumper, dominating the space and visually just wrong and interrupting the flow of the bodywork. Oof.
Sorry Lego, I love ya and I can excuse a lot, but sometimes it would have been better to skip a model than produce something as wrong as this.
It all hurts twice as bad because of the lovely Bugatti Type 35 set 4000048 that is limited to 250 sets and from all the pics looks wonderful I won't really ever be able to purchase.