
Omid (@nwbricks) examined all the new parts in LEGO® 10283 NASA Space Shuttle Discovery yesterday and today he explores the build process of this 2,354-piece set. It's available from 1 April 2021, and if you're buying it (or anything) please consider using our affiliate links: UK LEGO Shop | USA LEGO Shop | Australia LEGO Shop, for other countries 'Change Region'. New Elementary may get a commission. The products in this article were provided for free by LEGO; the author's opinions are not biased by this.
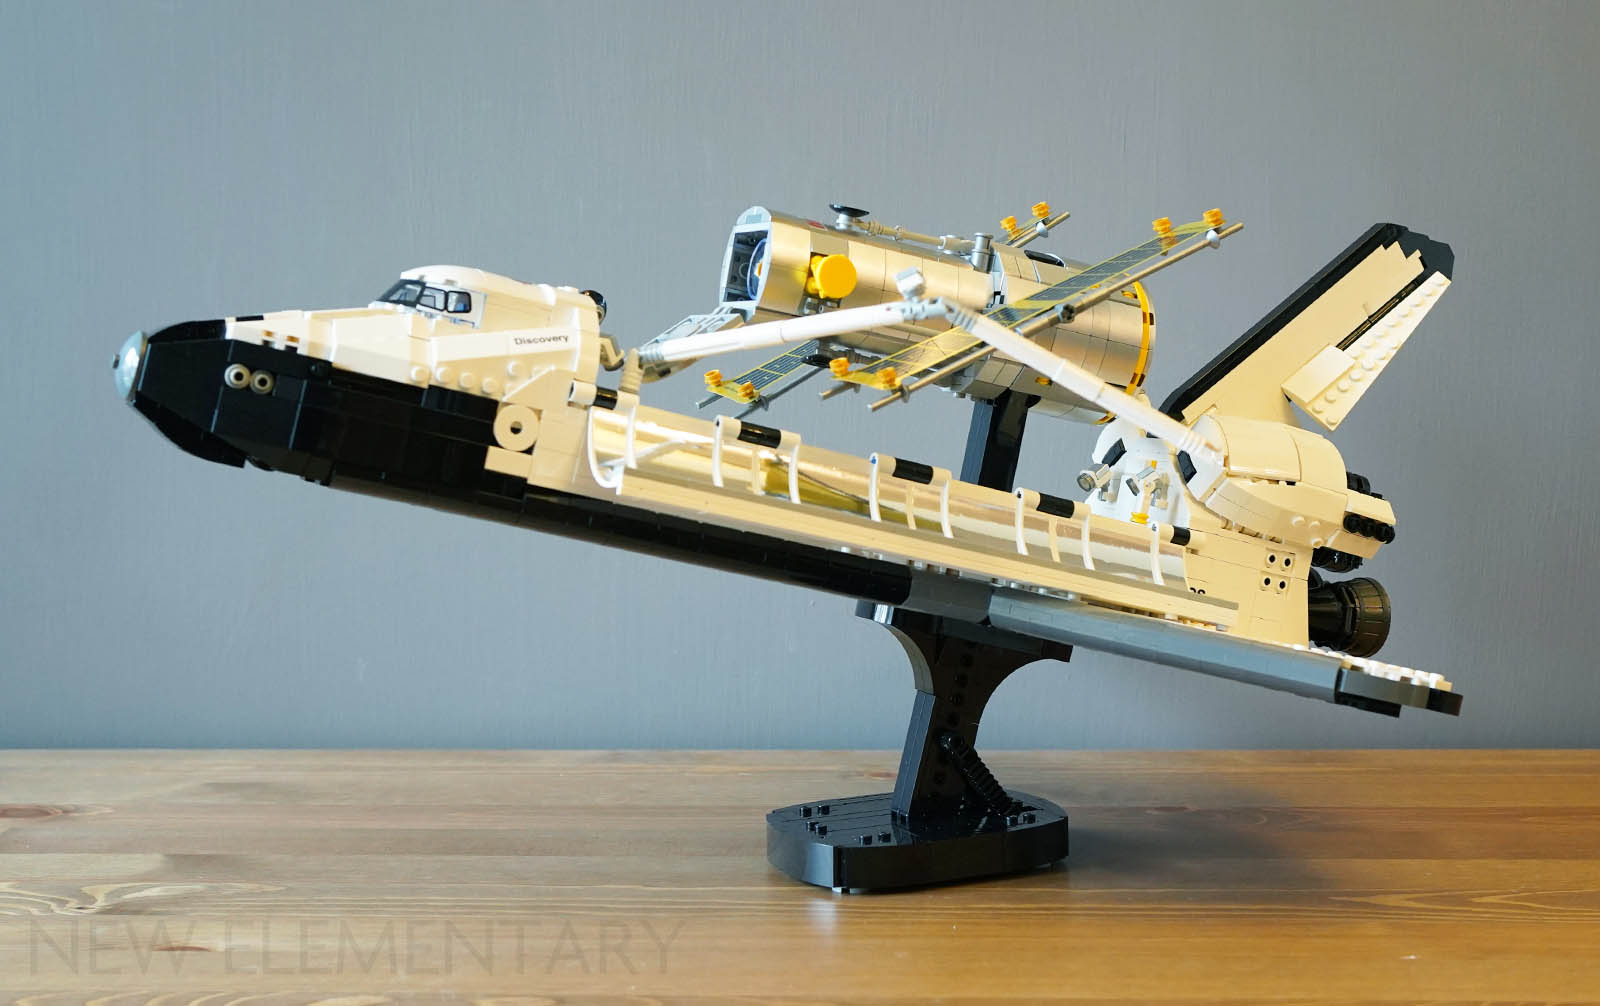
There’s actually two separate models in LEGO® NASA Space Shuttle Discovery to build: the Shuttle itself and its precious cargo, the Hubble Space Telescope. Each gets its own stand and information panel, but they can be combined into one display piece in a variety of ways and, yes, the entire telescope will fit snugly in the cargo bay - albeit with the solar panels removed.
The instruction manual is peppered with interesting facts and tidbits about the mission. And as you might expect, the build starts with the smaller of the two models.

The core of the telescope is built around a fairly rudimentary SNOT chassis with lots of greebly details. You can clearly see the difference between the flat and metallic silvers here.

That awkward moment when you’re not sure if you’re building a space telescope or a lightsaber…?! With all four sides clipped in and covered in shiny tiles, the model starts to take shape. The printed tile is a nice touch, especially as applying stickers to a curved, shiny surface sounds like an absolute nightmare.

Right from the off, the level of detail is incredible. Earlier this year we finally saw the arrival of the 8x8 round plate in 41926 Creative Party Kit and I had hoped we’d see this useful new piece here, but the alternative provided - four 4x4 quarter plates freshly recoloured in yellow - isn’t a bad compromise.

The last things to attach to Hubble are the solar panels, which make use of two special printed plastic sheets. The material seems identical to that used in last year’s 80012 Monkey King Warrior Mech for the flags and skirts, although last year also saw the introduction of a selection of printed solar array elements for the International Space Station. Who are we to question such things?
I have to say, out of the whole build these panels are probably my least favourite aspect. Their fiddly design is frustratingly difficult to keep square, thanks to the combination of bars that make up the structure. Note that this is where those candles newly cast in Flat Silver are utilised.

However you’d be hard pressed to say they don’t look the part when they are finally attached to the body. This in itself would have made an acceptable smaller set, or perhaps a chunky GWP in the same vein as the 40th Anniversary Train or the recent 40450 Amelia Earhart tribute.

The main build kicks off with the application of this enormous 8x16 sticker. Everyone has their own preferred way of applying stickers but as someone whose eye twitches at the slightest misalignment, the washing up liquid method has been a game changer for me.

Construction of the Shuttle itself starts with the wings and the beginnings of spring-loaded landing gear. It’s always interesting to see clever applications of Technic shock absorbers and they are certainly put to good use here.

I had to enlist some helpers for the next few steps! The shocks and landing gear have an annoying tendency to flap about all over the place in these early stages, so building on a flat surface is recommended. You can see the red 3x3 heart plates being put to use in the centre of the above photo.

With the front wheel added, central sliding mechanism installed and black trim in place around the edges, the Shuttle starts to take shape. The sliding mechanism is used to control the landing gear, and the handle doubles as the Shuttle’s succinctly named body flap.
You can also see the big 10x10 cut corner plates in position in the wings — just one example of the incredibly satisfying diagonal geometries inside this model. Trig got us to the moon and back, but that was child’s play compared to LEGO triangles.

At this point we’re onto bag nine, but it’s really bag four of the main build. Adding the big 6x6 tiles and starting to fill in the cargo bay more or less completes the shape and the space squad certainly seem happy to help, even if there’s slightly less trans-yellow than they’re used to!

The next steps focus on building up the huge RS-25 rocket engines. These monsters are something of a microcosm of the entire program: bonkers tech dreamt up in the ‘60s, built in the ‘70s and improved upon incrementally to the point where they are still being considered for use in the next generation of space flights.
The LEGO version doesn't produce quite as much thrust as the 418,000lbf output by the real things, but they are nicely detailed and there’s a neat little linkage which controls the ailerons via twisting the top booster. Rocket nerds will be quick to point out, however, that as a flying wing the real shuttle doesn’t have ailerons. It has elevons, which combine the pitch and roll effects of two separate components found on traditional aircraft. The official press release describes them as elevons and while twisting the booster does partially mimic the actual machine, the full range of motion isn’t there. They can only move in opposite directions like ailerons, which would affect the shuttle’s roll. Given the angle at which the model sits on its stand, up/down pitch control might have been more appropriate but yes, I’m splitting hairs here.

This shot of the rear assembly shows the attachment points at the base of the rudder. The mechanism for operating the elevons is really nicely hidden behind the top booster.

The underside of the model, while not exactly brimming with details, is strangely satisfying to look at. In this photo you can see the landing gear is down - it all retracts with a really satisfying detent and left me a little dumbfounded by its ingenuity.
Bag 13 focuses on building up the cargo bay, and there’s one last parting gift from the sticker gods: the merciless application of 24 super shiny (and super easy to scratch) mirror stickers.

Take your time, keep the surfaces nice and slick, and remember to slide not pick if you need to reposition something. I definitely bodged the corner of one but overall it went smoother than expected, and as we touched on in the first half of this review there is plenty of leftover material for moc applications.

Lenny and — wait, what’s our new orange friend from the Minifigure Encyclopedia called...? Penny? Denny? Evgeny? Either way they seem happy to help out! You can see the Ku-band antenna and the iconic Canadarm (aka Shuttle Remote Manipulator System) inside the cargo bay here. With just the nose cone and rudder to add, I was getting very excited at this point.

Now, we can’t talk about the nose cone without first addressing the elephant in the room: scale. There are four sets in the current LEGO NASA offering: 10266 Lunar Lander, 21309 Saturn V, 21321 International Space Station and now this. They are all fantastic models but none of them are in scale with each other.
The lander is roughly minifig scale, and the only one to include minifigs. The Saturn V with three microfigs is about 1:110 scale, with the real thing standing at a towering 363ft. At this scale, it more or less fits with 10231 Shuttle Expedition from 2011.

However, the real ISS is roughly the same length as the Saturn V rocket, so a LEGO version in the same scale would have easily taken the crown of biggest set ever. This shuttle sits somewhere in between and accordingly, contains no minifigs. It uses four of the blue inverted brackets as seats, which are too large to be convincing for microfigs and too small for minifigs.
This doesn’t detract one bit from any of the models, which taken individually are all masterpieces. But if scale is one of your hangups, it’s just something to consider. If anyone fancies building a minifig scale ISS please let me know so I can cheer you on!

With the rudder installed you can still just make out of the top of the elevon linkage, before the smaller maneuvering engines are added.

On the real Shuttle the rear rudder splits in half like a book to act as a speed brake, functionality that is also present on the LEGO model!

The nose cone itself is a thing of beauty. The two new shallow quarter dome pieces make up the roof, sitting on top of that lovely printed new cockpit piece.
Conclusion
The LEGO NASA Space Shuttle Discovery is absolutely brimming with intricate details, clever building techniques and engaging play features. So yes, while this is without doubt primarily a display piece owing to its sheer size and weight, there is still a lot of fun to be had operating the landing gear and wiggling the rear booster, and clearly a huge amount of time and effort has gone into the design of this set. It’s genuinely really pleasing to see no stone left unturned — I was surprised and delighted in equal measures to discover the whole telescope can be stored in the cargo bay.

On top of all that there’s a host of potential moc opportunities. Given more time I would have loved to build the external fuel tank and solid rocket boosters. Of course, you’d then want to build the launch tower and platform, the crawler transporter, the hangar, the support vehicles…
The designers have totally nailed the form and functions (within reason, of course) of a truly iconic machine which was — and is — so much more than the sum of its parts. Notwithstanding the aforementioned scale issues across the current crop of LEGO NASA space sets, this is simply a must-have for any fans of LEGO or NASA, or both. The only real detractor for me is the black page backgrounds on the instructions, but as we mentioned earlier there’s no dark brown or dark blue to deal with so that’s not as much of an issue as, say, 10275 Elf Club House from 2020.
From top to bottom it is an absolute gem. Perhaps in an ideal world, where the fibre optic and 9v systems had never been retired, we’d have seen some more nods to the old 8480 Technic set which, as it turns out, is more or less the exact same size. Having said that, there is a lot to be said for the traditional hand-of-god controls and simple mechanical linkages — doubly so in this utterly remarkable set which harkens back to a bygone era which sat at the intersection of an analog reality and a digital pipe dream.

LEGO NASA Space Shuttle Discovery is available from 1 April 2021 for 179,99€/ £169.99/ US$199.99/ CA$269.99/ AU$299.99/ NZ$319.99. Please consider using our affiliate links: UK LEGO Shop | USA LEGO Shop | Australia LEGO Shop, for other countries 'Change Region'. New Elementary may get a commission.
READ MORE: Eero Okkonen shows how he uses curvy vehicle pieces in his LEGO figurines
Help New Elementary keep publishing articles like this. Become a Patron!
Massive thanks go to our 'Vibrant Coral' patrons: Elspeth De Montes, Megan Lum, Markus Rollbühler, Jorgito Mozo, Mevits Bricks, Font Review Journal, Baixo LMmodels, Andy Price, Anthony Wright, Chris Cook, London AFOLs, Gerald Lasser, Big B Bricks, Dave Schefcik, David and Breda Fennell, Huw Millington, Neil Crosby, Antonio Serra, Beyond the Brick, Sue Ann Barber & Trevor Clark, and Kevin Gascoigne. Vale Iain Adams, a great supporter of New Elementary.
LEGO® Shop at Home
USA: Save up to 30%. See what's on sale!
UK: Free delivery when you spend £50 or more at LEGO!
Australia:
Discover the latest promotions and offers on LEGO.com
Amazon USA: Amazon.com
Canada: Amazon.ca
UK: Amazon.co.uk
Deutschland: Amazon.de. As an Amazon Associate we earn from qualifying purchases.
All text and images are © New Elementary unless otherwise attributed.
That is awesome! I love the new pieces, and the build looks like a lot of fun. Can't wait! Thanks for the in-depth article.
ReplyDeleteScale-wise, what would you think of the Heroica minis? There are some space-themed ones from 3842 Lunar Command ...
ReplyDeleteHaving built the set for myself now, they wouldn't fit (at least not in the cockpit area). Those figs were two bricks (six plates) tall, whereas the cockpit of the shuttle only has five plates of clearance above the seats, and the deck below that has even fewer (four plates). Sadly even the five-plate tall "baby" figs are too big for the cockpit—the tiny stud atop their head causes a collision on all but the rearmost seat.
DeleteThis comment has been removed by the author.
ReplyDeleteWhy no comments about the bad quality of the silver colourisation of the Hubble slopes? Or the different white tone of the NASA and Discovery stickers?
ReplyDeleteFirst I've heard of it personally. I guess it didn't bother the reviewer, or he didn't notice. Best thing for you to do would be to contact Customer Services - it's only if they have the data that customers are bothered by this that they will ever soend the extra money involved in improving quality.
DeleteThis was probably the most fun I had building a set in a long time. I was giddy as a child assembling the landing gear mechanics and watching them flip out synchronized with one another. This set also feels SOLID. Sure the Saturn V was heavy, but I never felt comfortable with my 3 year old playing with it. I'd let her roll the shuttle around no problem.
ReplyDeleteLove the detailed article! This was very helpful! Thank you!
ReplyDelete